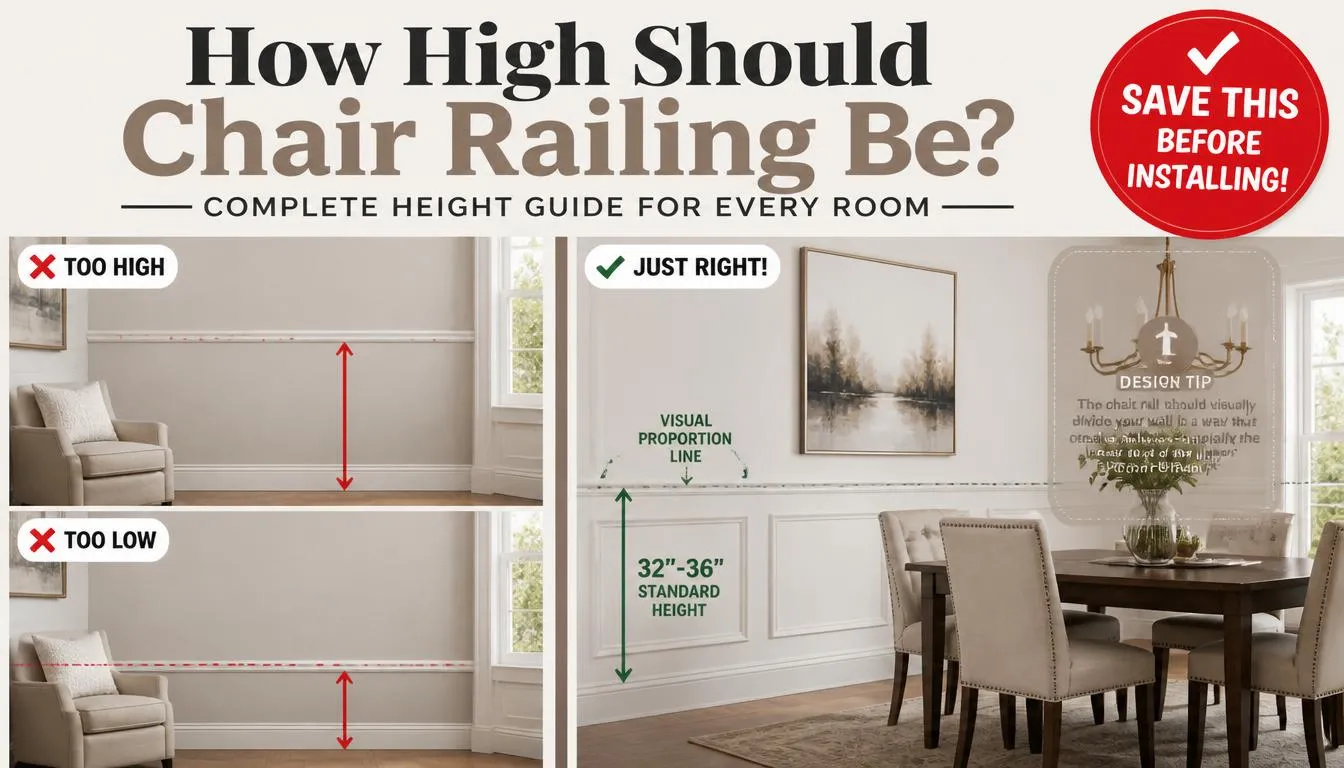
Quick Answer: The standard chair rail height is 32 to 36 inches (81 to 91 cm) from the finished floor, making it suitable for most homes with 8-foot ceilings. However, the ideal height also depends on your ceiling height, room size, window placement, and whether you’re installing wainscoting or using the chair rail as a decorative feature.
If you’re wondering how high your chair railing should be, you’re not alone. I had the same question before installing chair rails in my dining room, and I quickly realized there wasn’t a one-size-fits-all answer. Some designers recommend following the one-third wall rule, while others focus on visual balance instead of strict measurements.
The good news is that you don’t have to guess.
In this guide, I’ll explain the standard chair rail height, show you how to calculate the best placement for different ceiling heights, share practical examples for every room, and help you avoid common installation mistakes. By the end, you’ll know exactly where your chair rail should go to achieve a balanced, professional-looking finish.
What Is a Chair Rail?
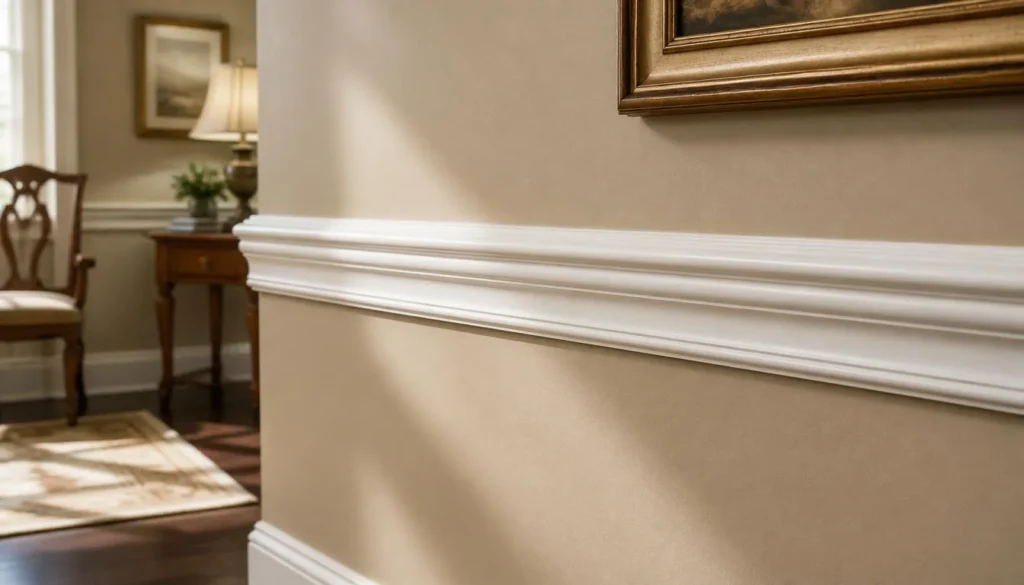
A chair rail is a horizontal trim molding installed around a room, usually about one-third of the way up the wall. Originally, it protected walls from being damaged by the backs of chairs, especially in dining rooms. Today, it serves both functional and decorative purposes.
Modern homeowners use chair rails to:
- Protect painted or wallpapered walls
- Divide two paint colors
- Separate wallpaper from painted surfaces
- Add architectural interest
- Enhance traditional, farmhouse, colonial, and modern interiors
- Pair with wainscoting or decorative wall panels
Although chair rails are often associated with formal dining rooms, they now appear in living rooms, hallways, bedrooms, bathrooms, staircases, and home offices.
How High Should Chair Railing Be?
The standard chair rail height is 32 to 36 inches from the finished floor.
This height works well because it aligns with the average height of most dining chairs while also creating balanced wall proportions.
Here’s a quick reference:
| Ceiling HeightRecommended Chair Rail Height | |
|---|---|
| 8 feet | 32–36 inches |
| 9 feet | 34–38 inches |
| 10 feet | 36–40 inches |
| 12 feet | 40–48 inches |
Although these measurements work for most homes, I don’t recommend treating them as strict rules. Every room has different architectural features that influence the final placement.
For example:
- Large windows may require slight adjustments.
- Tall baseboards change visual proportions.
- Wainscoting panels affect overall balance.
- Furniture placement can influence where the chair rail looks best.
The goal isn’t simply hitting an exact measurement—it’s creating a room that feels visually balanced.
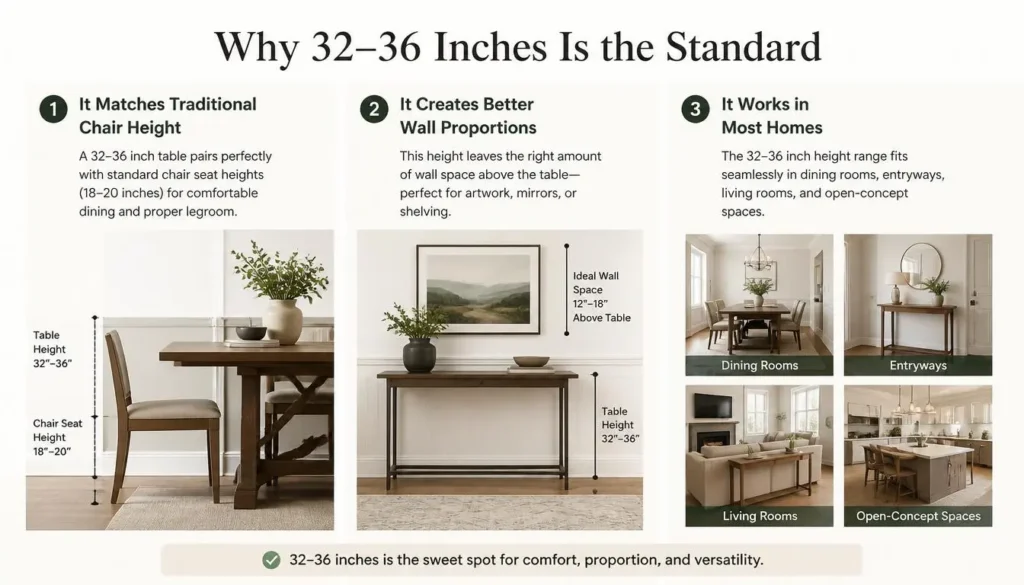
Why 32–36 Inches Is the Standard
Many people wonder why nearly every installation guide recommends 32 to 36 inches.
There are several reasons.
It Matches Traditional Chair Height
Historically, chair rails protected walls from dining chairs. Most chair backs fall below this height, making the molding an effective barrier.
It Creates Better Wall Proportions
Installing the trim approximately one-third of the way up the wall naturally divides the space without making either section feel too large or too small.
It Works in Most Homes
Since many homes have 8-foot ceilings, placing the chair rail around 34 inches provides a balanced appearance that suits both traditional and contemporary interiors.
Chair Rail Height Calculator
If your ceiling height differs from the standard 8 feet, you can estimate an ideal placement using a simple formula.
Recommended Formula
Chair Rail Height = Wall Height × 0.33
This follows the classic one-third design principle.
Examples
| Ceiling HeightWall HeightEstimated Chair Rail Height | ||
|---|---|---|
| 8 ft | 96 inches | 32 inches |
| 9 ft | 108 inches | 36 inches |
| 10 ft | 120 inches | 40 inches |
| 12 ft | 144 inches | 48 inches |
This formula provides an excellent starting point.
However, I always recommend checking how the molding looks before permanently installing it. Painter’s tape is one of the easiest ways to visualize the finished height.
Chair Rail Height Formula Explained
Some homeowners believe the one-third rule is mandatory.
It isn’t.
Think of it as a design guideline rather than a strict building rule.
Here’s how I usually approach it:
- Measure the floor-to-ceiling height.
- Divide that measurement by three.
- Mark the wall.
- Step back several feet.
- Compare the line with windows, doors, cabinets, and furniture.
- Make small adjustments if needed.
Sometimes moving the chair rail up or down by just one or two inches dramatically improves the finished appearance.
Professional interior designers regularly make these small adjustments because every room is unique.
Chair Rail Height by Ceiling Height
One of the biggest mistakes I see is using the same measurement in every room regardless of ceiling height.
Let’s look at what generally works best.
8-Foot Ceilings
This is the most common ceiling height in North America.
Recommended height:
32–36 inches
Personally, I find 34 inches creates the best visual balance in most homes.
It leaves enough room for decorative molding while keeping the wall proportions comfortable.
Ideal for:
- Dining rooms
- Living rooms
- Bedrooms
- Home offices
- Hallways
9-Foot Ceilings
Rooms with higher ceilings can support a slightly taller chair rail.
Recommended height:
34–38 inches
A placement around 36 inches often feels balanced while maintaining traditional proportions.
This extra height prevents the lower section of the wall from appearing too short.
10-Foot Ceilings
Larger rooms benefit from a higher installation.
Recommended height:
36–40 inches
In many custom homes, I notice installers place chair rails between 38 and 40 inches, especially when decorative wall panels are included.
12-Foot Ceilings
Very tall ceilings require careful planning.
Recommended height:
40–48 inches
Instead of focusing only on measurements, consider:
- Window height
- Wall panel size
- Crown molding
- Large furniture
- Overall room proportions
Tall walls offer more flexibility, so visual balance becomes more important than following a formula.
Chair Rail Height by Room
Not every room should use exactly the same chair rail height.
Furniture, windows, lighting, and room size all influence what looks best.
Here’s what I recommend.
Dining Room
The dining room is where chair rails originated, making it the easiest place to follow traditional guidelines.
Recommended height:
32–36 inches
This protects the wall from dining chairs while creating a timeless appearance.
If you’re adding wainscoting, ensure the panel layout looks symmetrical beneath the chair rail.
Living Room
Living rooms often have larger furniture and fewer chairs touching the walls.
That means the chair rail becomes more decorative than protective.
Recommended height:
34–36 inches
Consider aligning the molding with nearby architectural features rather than strictly following the one-third rule.
Bedroom
Bedrooms typically use chair rails for style rather than wall protection.
Recommended height:
32–36 inches
Many homeowners pair chair rails with two-tone paint, wallpaper, or decorative molding to create an elegant accent wall.
Hallway
Hallways receive heavy foot traffic, making chair rails both practical and decorative.
Recommended height:
32–34 inches
This placement helps protect walls from moving furniture, bags, and everyday wear while maintaining consistent proportions throughout the home.
Bathroom
Bathrooms can look surprisingly elegant with chair rails, especially when combined with beadboard or moisture-resistant wainscoting.
Recommended height:
32–36 inches
If your bathroom has a vanity backsplash or decorative tile, position the chair rail so it complements those features instead of competing with them.
Home Office
A home office benefits from subtle architectural details without feeling overly formal.
Recommended height:
34–36 inches
Chair rails work beautifully with painted wall panels, creating a professional yet inviting workspace.
Staircase
Installing chair rails along staircases requires more planning because the molding usually follows the angle of the stairs.
Instead of measuring only from the floor, focus on maintaining a consistent visual distance that follows the staircase naturally.
Many homeowners find it helpful to dry-fit the molding before making final cuts, ensuring the finished installation flows smoothly from the lower level to the upper landing.
Chair Rail vs. Wainscoting
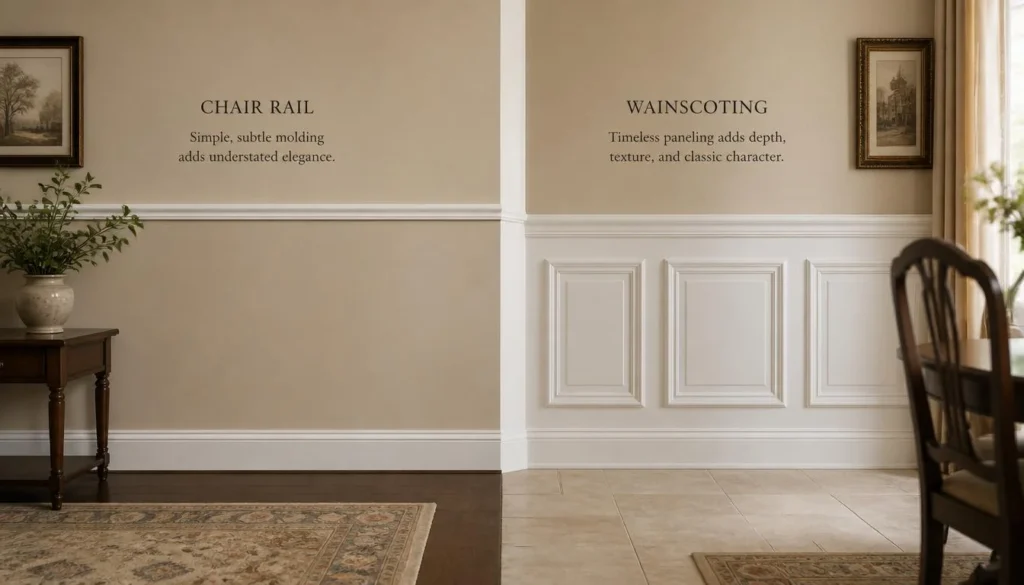
Many homeowners assume chair rails and wainscoting are the same thing, but they serve different purposes.
A chair rail is a single horizontal molding installed on the wall. It can be used alone or combined with other decorative elements.
Wainscoting is a decorative wall treatment that covers the lower portion of the wall with panels, beadboard, or raised molding. A chair rail often finishes the top edge of the wainscoting.
Here’s a simple comparison:
| Feature | Chair Rail | Wainscoting |
|---|---|---|
| Covers entire lower wall | No | Yes |
| Decorative | Yes | Yes |
| Protects walls | Yes | Yes |
| Installation cost | Lower | Higher |
| DIY friendly | Yes | Moderate |
| Adds architectural detail | Moderate | High |
If you’re installing wainscoting, always determine the panel height first. The chair rail should sit naturally above the panels instead of forcing the panels to fit the molding.
Chair Rail Height with Wainscoting
When chair rails are paired with wainscoting, proportions become more important than following a fixed measurement.
A good rule is to let the wall design guide the final height.
Generally, these heights work well:
- 8-foot ceiling: 32–36 inches
- 9-foot ceiling: 34–38 inches
- 10-foot ceiling: 36–40 inches
Before attaching anything permanently, I recommend assembling a few panels on the floor or temporarily taping their layout to the wall. This simple step can prevent uneven spacing and awkward-looking panel sizes.
Tips for Better Proportions
- Keep panel widths consistent.
- Leave equal spacing between panels.
- Ensure the top rail aligns neatly with inside and outside corners.
- Balance the chair rail with the height of the baseboards and crown molding.
Chair Rail Without Wainscoting
A chair rail doesn’t require wainscoting to look attractive.
Many modern homes use chair rails as a decorative transition between two wall finishes.
Popular ideas include:
- White trim with dark lower walls
- Two-tone paint
- Wallpaper below the chair rail
- Wallpaper above the chair rail
- Picture frame molding beneath the rail
- Textured paint or decorative finishes
Using a chair rail alone is often the easiest and most affordable way to add character to plain walls.
Best Chair Rail Placement
The correct placement isn’t always determined by a tape measure.
Instead, consider the room as a whole.
Ceiling Height
Higher ceilings usually require slightly higher chair rails to maintain proper proportions.
Window Placement
Avoid installing the chair rail so it cuts awkwardly across windows or trim.
If necessary, adjust the height slightly to create a cleaner appearance.
Door Trim
Whenever possible, align the chair rail so it transitions smoothly around door casings.
Small adjustments often make the finished room feel professionally designed.
Furniture Layout
Large cabinets, hutches, or built-in shelving may influence where the chair rail looks most balanced.
Wall Proportions
Take several steps back before making your final decision.
The best-looking installation often comes from what feels visually balanced rather than what matches an exact number.
Common Chair Rail Height Mistakes
I’ve seen beautiful trim installations ruined by a few avoidable mistakes.
Here are the most common ones.
Installing It Too High
A chair rail placed too close to the middle of the wall can make the ceiling appear lower and the room feel cramped.
Installing It Too Low
Placing the molding too close to the baseboard leaves the upper wall looking oversized and unbalanced.
Ignoring Windows
Chair rails that intersect windows awkwardly can make even an expensive room look poorly planned.
Forgetting Room Proportions
Copying measurements from another house without considering your own ceiling height rarely produces the best results.
Skipping Test Layouts
Painter’s tape is inexpensive and takes only a few minutes to apply.
Testing different heights before installation can save hours of repairs later.
Inconsistent Measurements
Always measure from the finished floor—not from the baseboard—so the chair rail stays level throughout the room.
How to Measure Chair Rail Height
Accurate measurements are the foundation of a professional installation.
Tools You’ll Need
- Tape measure
- Pencil
- Level or laser level
- Stud finder
- Painter’s tape
- Miter saw
- Nail gun or hammer
- Construction adhesive (optional)
- Caulk
- Paintable wood filler
Step 1: Measure the Wall
Measure from the finished floor to the ceiling.
Determine your desired chair rail height based on your ceiling height and room design.
Step 2: Mark Reference Points
Mark the selected height in multiple locations around the room.
Space your marks every few feet.
Step 3: Connect the Marks
Use a long level or laser level to draw a perfectly straight guideline.
This line becomes your installation reference.
Step 4: Locate Wall Studs
Mark every stud location before installing the molding.
Fastening into studs creates a stronger installation.
Step 5: Dry Fit the Molding
Before cutting every piece, temporarily position the molding against the wall.
Check corners, window trim, and door casings.
Making adjustments now is much easier than after installation.
Step 6: Cut the Corners
Inside and outside corners require accurate miter cuts.
Always test-fit each corner before securing it permanently.
Step 7: Install the Chair Rail
Attach each section using finish nails.
Apply construction adhesive if additional support is needed.
Check frequently with a level to ensure the molding remains straight.
Step 8: Fill, Caulk, and Paint
Fill nail holes with wood filler.
Apply paintable caulk along the top and bottom edges.
After the filler dries, sand lightly and paint the chair rail to match your trim.
The finished result should look seamless.
Chair Rail Design Ideas
A chair rail can dramatically change the appearance of a room.
Here are some timeless design ideas.
Two-Tone Walls
Paint the lower wall a darker color and the upper wall a lighter shade.
This creates depth while making the room feel more sophisticated.
Picture Frame Molding
Install decorative box molding below the chair rail for a custom-built appearance.
This style works especially well in dining rooms and entryways.
Wallpaper Accent
Wallpaper either above or below the chair rail adds texture without overwhelming the room.
Large floral, grasscloth, or geometric patterns all work beautifully.
White Trim with Bold Paint
Classic white molding paired with navy, forest green, charcoal, or deep gray creates a clean and timeless contrast.
Modern Minimalist Style
Choose a simple square-profile chair rail and pair it with neutral paint colors for a sleek contemporary look.
Traditional Elegance
Combine chair rails with raised wall panels, crown molding, and tall baseboards for a refined, formal appearance.
Before You Install: A Simple Checklist
Use this checklist to avoid costly mistakes.
✔ Measure every wall.
✔ Confirm ceiling height.
✔ Decide whether you’ll install wainscoting.
✔ Check window and door trim.
✔ Test the height with painter’s tape.
✔ Locate every wall stud.
✔ Dry-fit every molding piece.
✔ Measure twice before cutting.
✔ Verify inside and outside corner angles.
✔ Purchase 10% extra molding for waste and mistakes.
Expert Tips for Better Results
After researching hundreds of professionally designed interiors and completing my own home improvement projects, I’ve found a few practices that consistently produce better-looking chair rail installations.
- Prioritize visual balance over rigid measurements.
- Use painter’s tape to test two or three different heights.
- Keep the chair rail level throughout the room.
- Match the molding profile with your existing trim.
- Coordinate the chair rail with your baseboards and crown molding.
- Choose high-quality pre-primed molding to reduce finishing time.
- Don’t rush corner cuts—clean joints make a huge difference in the final appearance.
- If you’re unsure, install one wall first and evaluate it before completing the entire room.
Small details often separate a DIY-looking project from one that appears professionally installed.
DIY vs. Hiring a Professional
Whether you should install a chair rail yourself depends on your experience, available tools, and the complexity of the room.
| DIY Installation | Professional Installation |
|---|---|
| Lower cost | Higher cost |
| Great for simple rooms | Ideal for complex layouts |
| Flexible schedule | Faster completion |
| Requires basic carpentry skills | Professional-quality finish |
| Best for confident DIYers | Best for intricate molding and custom homes |
If your room has multiple outside corners, staircases, or custom wall panels, hiring a professional may save both time and frustration.
For a standard square or rectangular room, however, many homeowners can complete the project successfully over a weekend with careful planning and the right tools.
How Much Does It Cost to Install Chair Rail?
The total cost depends on the molding material, room size, labor rates, and whether you’re installing it yourself or hiring a professional.
Typical price ranges include:
| Item | Estimated Cost |
|---|---|
| MDF chair rail molding | $1–$3 per linear foot |
| Solid wood molding | $3–$8 per linear foot |
| PVC or composite molding | $2–$6 per linear foot |
| Professional installation | $4–$10 per linear foot |
| Complete DIY project (average room) | Approximately $100–$300 |
| Professional installation (average room) | Approximately $300–$900 |
While DIY installation can reduce labor costs, investing in quality molding and taking the time to install it correctly often delivers the best long-term value. A properly installed chair rail not only enhances the appearance of a room but can also provide lasting protection for your walls.
Frequently Asked Questions
Is 36 inches the standard chair rail height?
Yes. A chair rail height of 36 inches from the finished floor is considered a standard measurement for many homes with 8-foot ceilings. However, heights between 32 and 36 inches are equally common, depending on the room’s proportions and design.
How high should a chair rail be on an 8-foot wall?
For an 8-foot (96-inch) wall, the recommended chair rail height is 32 to 36 inches. Many interior designers prefer around 34 inches because it creates balanced wall proportions while maintaining the traditional look of chair rail molding.
How high should a chair rail be on a 9-foot ceiling?
A 9-foot ceiling generally looks best with a chair rail installed between 34 and 38 inches from the floor. Around 36 inches is often the ideal choice for most rooms.
How high should a chair rail be on a 10-foot ceiling?
For 10-foot ceilings, install the chair rail between 36 and 40 inches. Taller walls can support slightly higher molding without making the room feel unbalanced.
Is the one-third rule always correct?
No. The one-third rule is a helpful design guideline rather than a strict rule.
While dividing the wall into thirds creates pleasing proportions in many rooms, you should also consider:
- Window placement
- Door trim
- Ceiling height
- Furniture
- Wainscoting
- Overall room design
Visual balance is often more important than following an exact mathematical formula.
Can a chair rail be higher than 36 inches?
Yes.
In homes with 9-foot or 10-foot ceilings, installing a chair rail above 36 inches often looks more natural. Decorative wall panels and taller ceilings usually benefit from a slightly higher placement.
Can a chair rail be lower than 32 inches?
Yes, but it’s generally not recommended unless you’re working with unusually low ceilings or trying to match existing architectural features.
A chair rail installed too low can make the upper wall feel overly large and out of proportion.
Should a chair rail line up with window sills?
Not necessarily.
If your window sills naturally align with the chair rail, the room can look very cohesive. However, forcing the molding to match window heights isn’t always the best choice.
Focus on creating overall visual harmony rather than matching every architectural element.
Can a chair rail go above window trim?
It can, but doing so often looks awkward unless the room has exceptionally tall ceilings.
Most designers recommend keeping the chair rail below window trim whenever possible.
Does every room need the same chair rail height?
No.
Each room should be evaluated individually.
Factors such as ceiling height, window placement, furniture, and decorative features may justify slight adjustments from one room to another.
Is chair rail molding still in style?
Absolutely.
Chair rail molding remains a popular design feature in 2026, especially when paired with modern paint colors, wall panels, wallpaper, or minimalist trim profiles.
Today’s chair rails are used more for architectural interest than wall protection.
Does a chair rail make a room look bigger?
It can.
When installed at the proper height, a chair rail creates visual structure that makes walls appear more balanced.
However, placing it too high or too low may have the opposite effect.
Can I install a chair rail myself?
Yes.
If you have basic DIY skills and the right tools, installing a chair rail is a manageable weekend project.
The most challenging parts are making accurate corner cuts and keeping the molding perfectly level.
What size chair rail molding should I buy?
Most homeowners choose chair rail molding between 2 and 3½ inches wide.
Larger homes with tall ceilings often look better with wider molding, while smaller rooms typically benefit from simpler profiles.
Should the chair rail match the baseboards?
It doesn’t have to match exactly, but the styles should complement one another.
Using molding with similar profiles, colors, and finishes creates a cohesive appearance throughout the room.
Can I install chair rail without wainscoting?
Yes.
Many homeowners install chair rails by themselves to separate paint colors, frame wallpaper, or add decorative trim.
A chair rail can look beautiful even without additional wall treatments.
What’s the best way to test chair rail height before installation?
The easiest method is to apply painter’s tape around the room at your proposed height.
Step back several feet and view the room from different angles before making any permanent cuts or nail holes.
This simple technique can save time, money, and frustration.
Final Thoughts
Choosing the right chair rail height isn’t about finding one perfect measurement—it’s about creating a room that feels balanced, attractive, and proportional.
For most homes, installing a chair rail between 32 and 36 inches from the finished floor delivers excellent results, especially with standard 8-foot ceilings. If your home has taller ceilings, don’t be afraid to raise the molding slightly to maintain visual harmony.
Before installing, take a few extra minutes to measure carefully, test the height with painter’s tape, and evaluate how the molding interacts with your windows, doors, furniture, and other trim. Those small adjustments can make the difference between an average-looking project and one that appears professionally designed.
Whether you’re updating a dining room, refreshing a hallway, adding elegant wainscoting, or giving your living room more architectural character, the right chair rail height will enhance both the style and functionality of your space.
With thoughtful planning, accurate measurements, and attention to detail, you can create a timeless finish that you’ll enjoy for years to come.