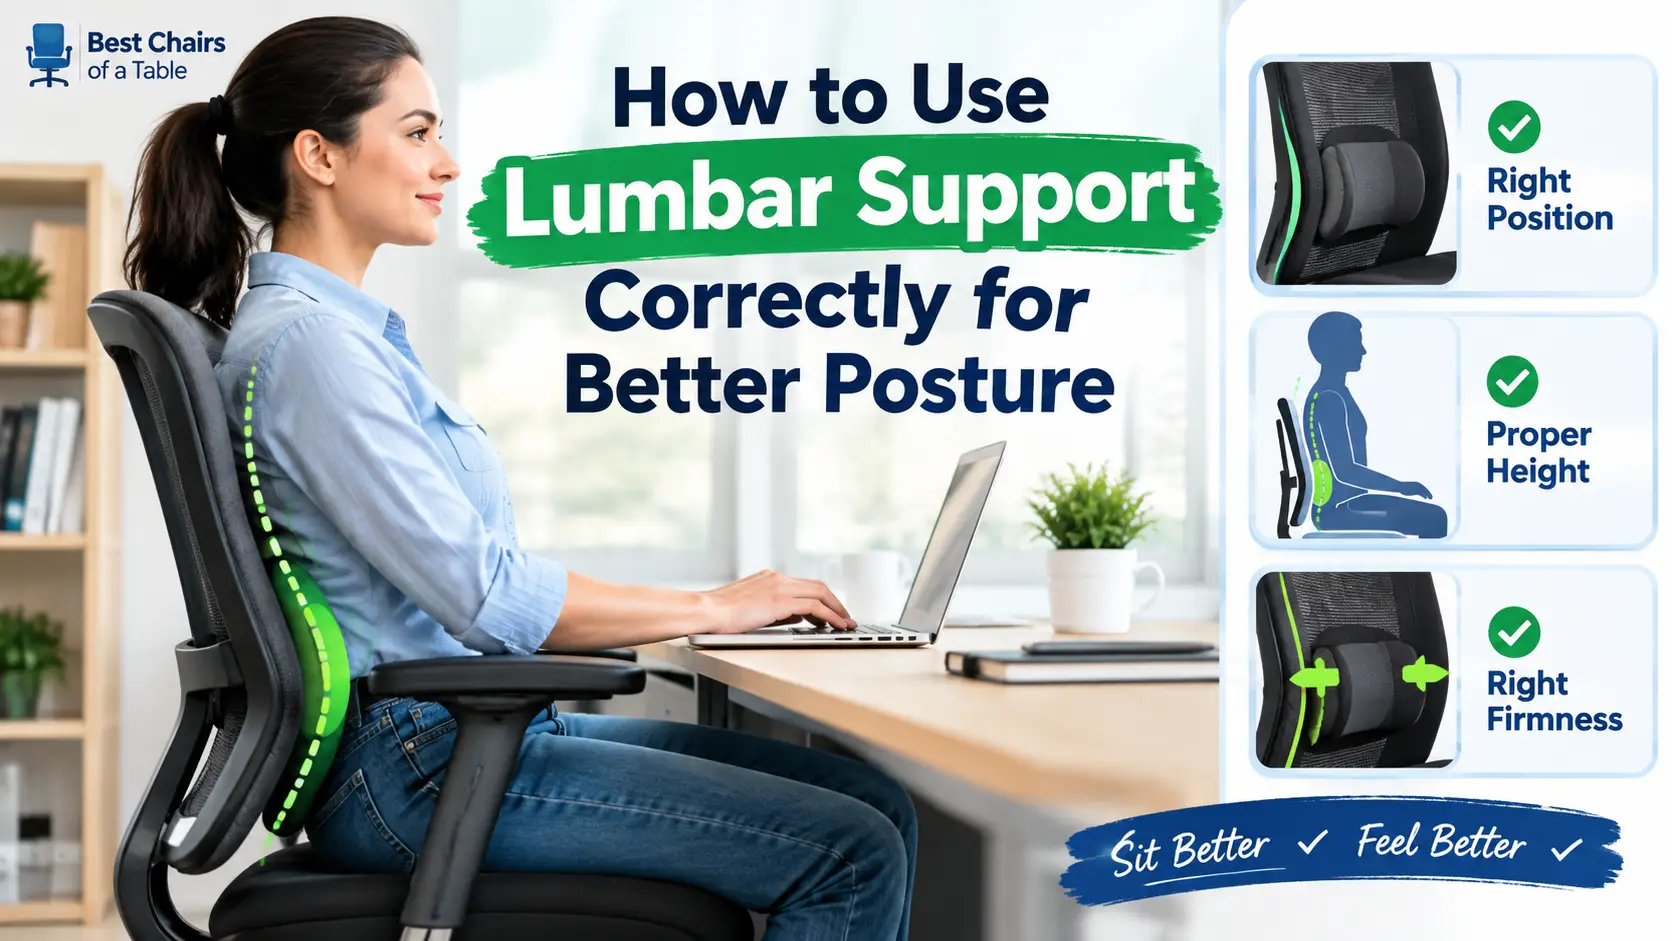
How to Use Lumbar Support Correctly begins with a simple but easily missed fact: the cushion belongs at the small of your back, not halfway up your spine and not resting on your hips. Most people place it in the wrong spot and blame the product instead of their own positioning. Getting it right takes about five minutes of deliberate adjustment and pays off in noticeably less aching at the end of a long day.
Where exactly that sweet spot lands depends on your body, your chair, and how far back you actually sit before you start working. Get the placement right and your lumbar curve stays supported through hours of sitting. Get it wrong and you can actually make your back pain worse.
This guide walks you through everything you need to know about positioning, choosing, maintaining, and troubleshooting lumbar support so you stop guessing and start getting real relief.

Image source: Bing (Web (fair-use with source credit))
Quick Answer
How to Use Lumbar Support Correctly means placing the cushion at the small of your back where your spine naturally curves inward. Position it between your belt line and the bottom of your ribcage. The widest part of the support should align with your L1 through L5 vertebrae.
Adjust the height first, then fine-tune the depth so the cushion fills the gap without forcing your spine into an exaggerated arch. Test the final position by sitting all the way back, crossing your ankles, and staying still for ten minutes. If you feel even pressure across your lower back with no pinch points and your shoulders stay relaxed, you’ve got it right.
Move it up too high and you compress your thoracic spine. Move it down too low and you support nothing at all.
Why Positioning Matters More Than You Think
Most people buy lumbar support with genuinely good intentions and then sit on it wrong. They toss a cushion behind them, lean back, and call it a day. The result is usually worse lower back pain than they walked in with.
That happens because the lumbar region of your spine is not a flat surface. It is a deliberate inward curve, technically called lordosis. When you sit, gravity pulls your pelvis backward and that curve starts to flatten.
A lumbar pillow’s only job is to hold the curve in place. Put it against the wrong part of your back and you flatten the curve in one spot while creating an unnatural arch in another. That mismatch turns a helpful tool into a liability.
Research from the National Institute for Occupational Safety and Health shows that improper workstation ergonomics contribute to roughly sixty percent of all reported lower back complaints among sedentary workers. The problem is almost never a lack of support. It is the incorrect placement of whatever support is already there.
Most users adjust their monitor height, their keyboard position, and their seat depth before they ever think about their lower back. By the time they add a cushion, they have already locked their body into a compromised position. Then they prop a pillow against their mid-back and wonder why they are still in pain.
The difference between relief and aggravation often comes down to about two inches of vertical positioning. Move a lumbar cushion up just two inches past your natural curve and you press against the ribcage instead of the lumbar vertebrae. That pressure travels upward and creates tension throughout your thoracic spine.
Your shoulders hike toward your ears. Your neck tightens. Now you are dealing with three separate problem areas instead of one.
Move the cushion two inches too low and you rest it on your sacrum, which is completely flat and provides zero lumbar support. The lumbar spine goes unsupported again. You spent money on a product that delivers nothing.
This is also why one-size-fits-all advice fails completely. Your spinal curve sits at a different height depending on your torso length, your hip angle, and how far back you slide into the chair. A tall person with long lumbar segments needs the cushion positioned noticeably higher than a shorter person with a compact spine.
Someone who reclines slightly shifts the contact point downward compared to someone sitting perfectly upright. There is no single measurement that works for every body. You have to find your own curve first, then build your entire setup around it.
How Lumbar Support Interacts With Your Spine
To understand why placement matters so much, you need a basic picture of what is actually happening inside your lower back while you sit. Your spine contains thirty-three vertebrae stacked on top of each other. The bottom five are the lumbar vertebrae, labeled L1 through L5.
Above them sits your sacrum, which locks into your pelvis. Below your lumbar region comes the thoracic spine, which curves outward. Together these curves form an S-shape that absorbs shock, distributes weight, and lets you bend without collapsing.
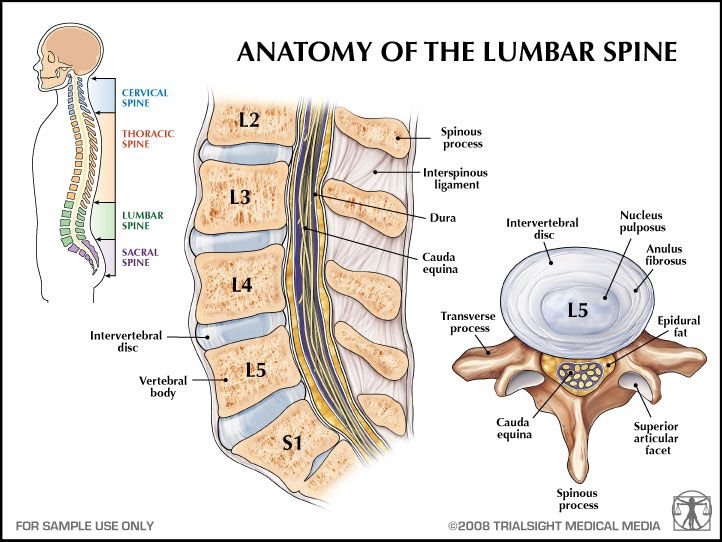
Image source: Bing (Web (fair-use with source credit))
When you stand, that S-curve sits in a relatively neutral position. Your lumbar region maintains its inward arch. When you sit down, especially in a soft or poorly designed chair, your pelvis tilts backward.
That tilt rolls your tailbone under you and flattens the lumbar curve. The discs between your vertebrae absorb that flattened posture by shifting fluid toward the back of each disc. Over time, that backward pressure weakens the disc walls and can lead to bulging or herniation.
Researchers call this the sitting flexion effect. It is the main mechanical problem that lumbar support is designed to counteract.
A properly positioned lumbar cushion works by pushing gently against the hollow of your lower back. That outward pressure encourages your pelvis to tilt slightly forward, restoring the natural lordotic curve. When the curve returns, the load redistributes from the back of the discs to the vertebral bodies themselves.
Your muscles do not have to work as hard to hold you upright. The entire system becomes more efficient. This only happens when the cushion touches the right area.
Press against your lower ribs instead and you force your thoracic spine into an excessive outward arch. Your body starts fighting itself.
The relationship between seat depth and lumbar support is critical and almost always ignored. If your chair seat extends too far forward, your knees press against the front edge and your pelvis locks into a tilted position. No amount of lumbar adjustment fixes that.
The foundation is wrong. You need enough seat depth that you can slide all the way back until your lower back touches the cushion, while leaving about two to four inches between the front edge of the seat and the back of your knees. That clearance lets your pelvis rotate freely.
Your lumbar support can then do its actual job instead of fighting against a seat that is pushing your hips forward.
Per ergonomic research published in Clinical Biomechanics, participants who used correctly positioned lumbar support showed significantly reduced erector spinae muscle activity compared to those who sat without support or with misaligned support. Lower muscle activity means less fatigue, less strain, and less chance of developing chronic tension. The key word is correctly positioned.
The same studies showed that misaligned lumbar support increased muscle activation in the wrong regions. That makes your back work harder than it would without any support at all. That is the paradox most people never figure out.
Step-by-Step: How to Place Lumbar Support Correctly
Getting the positioning right takes about five minutes the first time you do it. After that it becomes automatic. The process is straightforward if you follow it in order.
Do not skip ahead. Each step builds on the one before it. Getting the foundation wrong ruins everything that follows.
Finding Your Natural Lumbar Curve
Start by standing up straight. Place your hands on your hips with your thumbs resting against your lower back. Feel for that inward curve.
Now slowly bend forward at the waist like you are trying to touch your toes. Notice how the curve disappears. Now lean backward slightly, arching your lower back.
Feel that curve come back into focus? That is your natural lumbar lordosis. Mark that spot mentally.
Keep your thumb pressed there for a few seconds so your body remembers the location.
Now sit down in your chair. Slide all the way back so your buttocks and upper back are firmly against the seat and the backrest. Keep your feet flat on the floor.
Your knees should be bent at roughly ninety degrees. Cross your ankles. This position opens your hip angle and lets your pelvis sit in a neutral tilt rather than rolling backward.
Stay here for about thirty seconds and let your body settle.
Once you feel settled, reach behind you with both hands and press into the small of your back. Find the deepest part of that inward curve. That is your target zone.
The top of the curve sits somewhere around your belt line, though the exact height varies by torso length. For most adults, the sweet spot falls between the top of your hip bones and the bottom of your ribcage. If you are taller than six feet, you will likely need the support positioned closer to your mid-torso.
If you are shorter, it will sit lower. There is no shame in adjusting for your body. Everyone’s spine is different.
Setting the Height
This is where most people go wrong. Take your lumbar cushion or roll and position it against your lower back while you are sitting. The widest, fullest part of the support should align with that curve you just found.
Look in a mirror if you have one. Ask someone to check from the side. The top edge of the cushion should not reach above your lowest rib.
The bottom edge should not drop below your iliac crest, which is the bony ridge you can feel at the top of your hip.
If your chair has built-in lumbar adjustment, push the support upward or downward until it meets that same zone. Most adjustable lumbar systems move through about three to four inches of range. That is enough for most body types.
If you are using a standalone cushion, make sure it does not slide around. Look for a non-slip base or securing straps. A cushion that migrates down while you work is worse than no cushion at all.
It gives you false confidence while leaving your spine unsupported.
Here is a practical check that works reliably. Sit normally and notice where you feel pressure from the cushion. You should feel a broad, even band of contact across the width of your lower back.
If the pressure concentrates on one side, the cushion is too high or too low on that side. If you feel it only at the very top or very bottom, it is positioned incorrectly along the vertical axis. Reposition and try again.
Adjusting the Depth and Firmness
Height is only half the equation. How far the cushion pushes into your back matters just as much. The goal is gentle support, not aggressive force.
When you press the cushion against your lumbar curve, it should fill the gap between your back and the chair without pushing your spine into a pronounced arch. You should still feel like you are sitting relatively naturally, just with a bit of assistance behind you.
If the cushion pushes too hard, you will notice your chest coming forward and your shoulders rolling back involuntarily. That is hyperlordosis. It strains your facet joints and surrounding ligaments.
If the cushion is too soft or set too shallow, you will not feel any meaningful change in your posture. The curve remains flattened and nothing improves. Both extremes defeat the purpose.
The ideal firmness depends on your body weight and your existing comfort level. Heavier individuals generally need firmer foam or higher inflation pressure to prevent the cushion from bottoming out. Lighter individuals may find firm supports uncomfortably hard and should start with medium or soft options.
Memory foam adapts to your shape over time, which helps if your curve is slightly asymmetrical. Latex bounces back quickly and tends to stay consistent longer. Inflatable air cushions let you fine-tune the firmness precisely but can lose pressure over hours of sitting.
Hollow fiber fills are the cheapest option and the first to go flat, so they are usually not worth the investment unless you are testing the concept on a tight budget.
The 10-Minute Test to Verify Placement
Once everything feels reasonably close, commit to the test. Sit in your adjusted position for ten full minutes without fidgeting or readjusting. Keep your feet planted.
Keep your shoulders relaxed. Do not cross your arms or lean to one side. Just sit the way you sit during normal work.
After ten minutes, check in with yourself. Ask these questions:
- Do I feel pressure along my lower back or just at one point?
- Are my shoulders still relaxed or have they crept up toward my ears?
- Does my neck feel neutral or slightly strained?
- Am I unconsciously shifting my weight to one hip?
- Can I maintain this position comfortably for another twenty minutes?
If the answer to any of these is no, tweak the position and run the test again. A properly placed lumbar cushion feels unobtrusive after the first few minutes. You should not be constantly aware of it.
It is doing its job when you forget it is there. You should only notice it when you remove it and your back immediately misses the support.
| Checkpoint | Proper Placement | Wrong Placement |
|---|---|---|
| Vertical position | Between belt line and lower ribs | Above ribs or below hip bone |
| Pressure feel | Broad, even band across lower back | Pinch points or no contact |
| Shoulder position | Relaxed and down | Raised or rolled forward |
| Neck feel | Neutral, no strain | Slightly jutted or tense |
| 10-minute comfort | Unobtrusive, easy to maintain | Requires constant adjustment |
| Posture after removal | Immediate sense of unsupported curve | Noticeable difference |
This systematic approach takes less than fifteen minutes upfront and saves you weeks of frustration. Skip the process and you are guessing. Guessing is how people end up with back pain worse than when they started.
Common Mistakes That Make Back Pain Worse
Knowing the right way to position lumbar support is only half the equation. The other half is recognizing the patterns of misuse that turn a helpful tool into a source of new problems. These mistakes are so common that most people never connect their worsening pain to the very product they bought to fix it.
If you have been using lumbar support for weeks without relief, one or more of these errors is probably to blame.
Placing It Too High or Too Low
This is the single most frequent error and the one most likely to create secondary pain. When people cannot feel their lumbar curve clearly, they grab for the nearest available surface. That usually means a chair back that protrudes into their upper lower back, right where the lumbar region meets the thoracic spine.
The cushion ends up pressing against the rigid lower ribcage instead of the flexible lumbar spine. The result is a compensatory outward arch in the thoracic region and a collapsed curve below it. You now have a kyphotic-lordotic mismatch, and that pattern is a well-documented source of chronic mid-back and neck pain.
Place the cushion too low and you sit on your sacrum, which is a flat triangular bone with no curve to support. The lumbar region hangs freely above it, completely unsupported. This mistake is especially common among shorter individuals using standard one-size cushions on chairs designed for taller frames.
The cushion drops below the curve and vanishes into the seat pan.
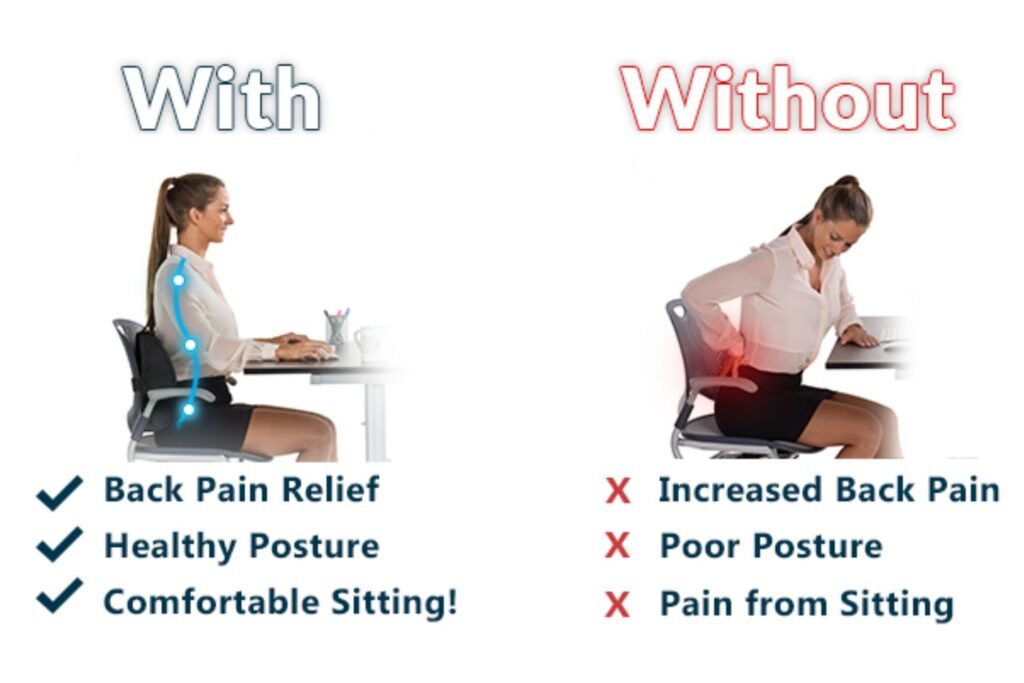
Image source: Bing (Web (fair-use with source credit))
If you are unsure whether your cushion is too high or too low, use the belt-line rule as your baseline. The top of your waistband when standing aligns roughly with the top of your lumbar curve when sitting. If the cushion sits above that line, it is too high.
If it sits below, it is too low. This rule of thumb is not perfect for every body type, but it is accurate enough to get you in the right neighborhood.
Over-Inflating or Choosing the Wrong Firmness
A firm cushion sounds like a good idea until you realize that firmness is not the same as effectiveness. The goal of lumbar support is to maintain a neutral curve, not to force your spine into a rigid arch. An overly firm or over-inflated cushion pushes your lumbar region forward with constant, unyielding pressure.
Your body responds by tightening the muscles along your spine in an attempt to resist the forced position. That creates a cycle of muscle guarding and localized inflammation that feels exactly like back pain, even though the real cause is the support itself.
Softer cushions avoid this problem but introduce a different one. They compress completely under your body weight within minutes. The support disappears and you are back to sitting with an unsupported curve.
The trick is finding the middle ground, where the cushion resists enough to hold the curve but yields enough to let your body sit naturally within it. If you press your fist gently into the center of the cushion while it is positioned against your back, you should feel resistance, but your fist should still sink in about half an inch. More resistance than that and it is likely too firm.
Less and it is probably collapsing under load.
For people with existing lower back conditions, starting with a medium-firm support and adjusting from there is the safest approach. Aggressive firmness on an already irritated spine tends to aggravate rather than relieve. The American Academy of Orthopaedic Surgeons recommends gradual adaptation for patients introducing any form of postural support, beginning with shorter wearing times and lower pressure settings before progressing to full-day use.
Ignoring the Relationship Between Seat Depth and Support
Seat depth and lumbar support are mechanically linked, yet most people treat them as independent variables. They are not. If your chair seat is too deep, your thighs rest against the front edge before your lower back can touch the backrest.
Your pelvis tilts backward. Your lumbar curve flattens. No lumbar cushion, no matter how well positioned, can compensate for a seat that is physically blocking your pelvis from reaching the backrest.
If your chair seat is too shallow, your thighs do not get adequate support and you tend to slide forward constantly. Your lower back loses contact with the cushion. You end up perching on the front edge of the seat with your entire body weight concentrated on your sit bones.
The lumbar support becomes irrelevant because you never actually touch it.
The correct seat depth allows you to sit all the way back with your lower back in full contact with the lumbar support while leaving two to four inches between the front edge of the seat and the back of your knees. This gap prevents pressure on the popliteal area while ensuring your pelvis can tilt into the optimal forward position. If your current chair does not allow this gap, either add a seat cushion to raise your seating position slightly or accept that the lumbar support alone will not solve your problem and consider exploring a quality ergonomic chair designed for proper spine alignment.
Using a Sliding or Unstable Cushion
A lumbar cushion that slides down your back while you sit is arguably worse than having no cushion at all. It creates a false sense of security. You think you are supported.
You are not. Meanwhile, you are subtly shifting your weight and adjusting your position every few minutes to keep the cushion from migrating. Those micro-adjustments accumulate into significant muscle fatigue over the course of a workday.
Look for cushions with non-slip silicone backing or fabric designed to grip chair upholstery. Some models include straps that wrap around the chair back to lock the cushion in place. Others clip directly into the chair frame.
If you are using a cheap pillow from a department store, it will slide every time you lean back. The investment in a purpose-built lumbar support with anti-slide features pays for itself in consistency and comfort.
This issue is particularly problematic for mesh-backed office chairs. The open weave provides virtually no friction, so most standard cushions slide down within minutes. Mesh chairs typically require either a dedicated lumbar attachment that clips onto the frame or a cushion with an aggressive non-slip surface specifically engineered for mesh compatibility.
What Type of Lumbar Support Fits Your Situation

Image source: Bing (Web (fair-use with source credit))
Not all lumbar supports are created equal, and the wrong type for your body and your chair can undermine even perfect positioning. The market offers several distinct categories, each with genuine trade-offs. Understanding what each one does well and where it falls short helps you match the right tool to your specific needs rather than defaulting to the cheapest option or the most heavily marketed product.
Memory Foam and Contoured Cushions
Memory foam cushions are the most popular category for a reason. They conform to your unique spinal curve rather than forcing your body to conform to a predetermined shape. This adaptability makes them forgiving for people whose curves are slightly asymmetrical, which is actually quite common since most people carry more weight on one side of their pelvis than the other.
The contouring action distributes pressure evenly across the entire contact surface, reducing hot spots that develop with uniform-density materials.
The downside is that memory foam compresses over time, especially in warmer environments. Body heat softens the foam cells, and repeated compression gradually reduces the material’s ability to rebound. A memory foam cushion that feels supportive in month one may feel flat by month six if you sit on it eight hours a day.
Higher density foams, four pounds per cubic foot and above, resist this degradation better than cheaper variants. The trade-off is that high-density foam is noticeably firmer initially, which some users find uncomfortable until it breaks in.
Contoured designs refer to the shape of the cushion itself, not the material. A properly contoured lumbar cushion has a curved profile that mirrors the natural inward sweep of the lumbar spine. Flat rectangular pillows lack this anatomical shaping and tend to press against a single point rather than distributing support along the curve.
Look for wedges or kidney shapes rather than flat rectangles when possible.
Inflatable Lumbar Rolls
Inflatable lumbar supports give you the most control over firmness because you literally adjust the air pressure. This category is particularly valuable for people who share a chair with multiple users, since each person can set their own level of support without swapping equipment. They are also lightweight and compact, making them ideal for travel, car seats, or temporary work setups.
The trade-off is durability and consistency. Air-filled cushions lose pressure gradually over a day of sitting, requiring occasional re-inflation to maintain the same level of support. The seams and valves are potential failure points, and cheaper models can develop leaks within months of regular use.
The inflation mechanism itself, usually a small plastic valve, can become difficult to operate with sweaty or cold hands. For short-term or occasional use, inflatable options are perfectly adequate. For full-day daily use, they tend to frustrate users who find themselves topping off air pressure three or four times during a single work session.
Built-in Ergonomic Chair Adjustments
Many mid-range and premium ergonomic chairs come with integrated lumbar support systems. These are adjusted via levers, knobs, or dials built directly into the chair back. The advantage is seamless integration, since the support moves with the chair rather than sliding independently.
The disadvantage is that built-in systems rarely accommodate extreme body types or unusual spinal curvatures as effectively as aftermarket cushions, which you can position and size more precisely.
If you already own an ergonomic chair with adjustable lumbar support, use the positioning process outlined earlier to optimize that built-in system before purchasing an additional cushion. An extra cushion layered on top of a poorly adjusted built-in system often creates conflicting pressure points instead of solving them.
Back Braces vs. Cushions (When Each Applies)
Medical-grade back braces and lumbar support cushions serve fundamentally different purposes, though people frequently confuse them. A lumbar cushion is a passive ergonomic tool designed for healthy individuals or those with mild discomfort who want to maintain proper posture during extended sitting. It works by supporting the natural curve and reducing muscle fatigue.
A back brace, on the other hand, is a clinical device intended to restrict movement, provide compression, and stabilize the spine during injury recovery or post-surgical healing.
You should only consider a back brace if a healthcare professional recommends one for a specific condition. Wearing a rigid lumbar brace for prolonged periods without medical supervision can actually weaken your core muscles over time. Your body learns to rely on the external support instead of maintaining its own stabilizing strength.
Once the brace is removed, your back may feel less stable than before you started using it. This is why braces are typically prescribed for short-term use only, usually two to six weeks depending on the diagnosis.
If you have been diagnosed with a herniated disc, spinal stenosis, spondylolisthesis, or recovering from lower back surgery, consult your orthopedic specialist before using any form of lumbar support. They can advise whether a therapeutic brace, a gentle cushion, or a combination approach is appropriate for your specific condition. Self-prescribing clinical devices based on internet advice carries real risks, especially when the spine is already compromised.
Best Practices for Different Users and Situations
Your body type, your daily routine, and your existing health conditions all influence how you should approach lumbar support. One configuration that works perfectly for a sedentary office worker may cause problems for a truck driver or someone managing chronic pain. The following breakdown addresses the most common user profiles and the specific adjustments each one requires.
Office Workers and Desk Jobs
Office workers typically sit eight or more hours per day, which makes proper lumbar support non-negotiable for long-term spinal health. The key for this group is sustainability. Whatever support you choose needs to stay effective across an entire workday without requiring constant attention or adjustment.
Memory foam cushions with contoured shapes tend to perform best for full-day desk work because they maintain their form and distribution evenly throughout the day.
Set up your lumbar support first thing in the morning after adjusting your chair height and seat depth. Run through the positioning steps outlined earlier, then commit to the ten-minute test before starting work. If you pass that test, you can go about your normal routine knowing your spine is properly supported.
Check your position around lunchtime as a midday reality check. Small shifts happen during a long day, and a quick reassessment prevents minor drift from becoming major discomfort by afternoon.
Integrate standing breaks into your workflow regardless of how good your lumbar support is. Even perfect positioning cannot compensate for sitting motionless for eight consecutive hours. The National Institute for Occupational Safety and Health recommends breaking up sustained sitting every thirty minutes with at least two minutes of standing or walking.
Set a timer if you need to. These micro-breaks reset your posture, restore circulation, and prevent the cumulative fatigue that leads to poor positioning habits later in the day.
Long-Distance Drivers
Driving presents unique lumbar support challenges because car seats are generally thinner, firmer, and less adjustable than office chairs. The seated position also forces your hips into a more open angle, which flattens the lumbar curve more aggressively than desk sitting. Combine these factors with road vibrations and extended uninterrupted periods, and you have a recipe for significant lower back strain if support is not handled correctly.
Travel-sized lumbar rolls or inflatable cushions work well for vehicles because they are easy to reposition and store between trips. Look for models with non-slip backing that can grip fabric or vinyl car seats. Secure the cushion behind your lower back before you start the engine.
Drive for thirty minutes, then pull over and assess how your back feels. Adjust height or firmness as needed on subsequent trips until you find a configuration that holds throughout the drive.
Professional truck drivers often report better results with wedge-shaped cushions that angle the pelvis slightly forward rather than round rolls that push only against the spine. The wedge design combats the open hip angle that driving creates, helping maintain the natural lordotic curve despite the seated position. Some truckers also place folded towels under the small of their back as a temporary solution, but this method degrades quickly and requires frequent readjustment compared to purpose-built products.
People Managing Existing Lower Back Pain
If you already experience lower back pain, the stakes change significantly. Improper lumbar support can aggravate an existing condition, while correct placement may provide meaningful relief. The difference between helpful and harmful often comes down to firmness selection and professional guidance.
Start with a medium-firm cushion and begin with short wearing sessions of twenty to thirty minutes rather than attempting full-day use immediately.
Pay close attention to how your pain responds during the first week of use. Improved comfort and reduced stiffness indicate proper placement. Increased ache, sharp pain, or numbness traveling down your legs signals that something is wrong.
Back off immediately and reassess your positioning or seek professional advice. Do not push through worsening symptoms hoping they will improve with time. That approach commonly leads to longer recovery periods and more serious complications.
Consult a physical therapist or spine specialist before making lumbar support part of your daily routine if you have a diagnosed back condition. They can identify which curves need support, which movements to avoid, and whether additional interventions like core strengthening exercises would complement the support better than relying on it alone. Lumbar cushions address posture, but they do not strengthen the muscles that hold your spine in place long-term.
A combined approach yields far better outcomes than either strategy used in isolation.
Pregnant Users
Pregnancy shifts your center of gravity forward and increases the lumbar curve as the body compensates for the growing belly. This anatomical change places additional strain on the lower back, making supportive seating arrangements especially valuable during the second and third trimesters. However, pregnant individuals need cushion designs that accommodate their changing posture without creating new pressure points.
A contoured memory foam pillow placed behind the lower back and slightly tilted to match the increased lordotic curve can relieve significant discomfort during pregnancy. Avoid overly firm supports that push too aggressively into the spine, since hormonal changes during pregnancy loosen ligaments and increase susceptibility to joint strain. Gentler support with more give tends to be safer and more comfortable for expectant mothers.
As pregnancy progresses, you may need to adjust the cushion position upward slightly to account for the expanding abdomen pulling your pelvis forward. Reassess your setup every few weeks during the latter half of pregnancy. What worked in month four may not fit comfortably by month seven.
Regular adjustments keep the support effective throughout the changing anatomy rather than fighting against it.
Tall and Petite Body Types
Standard lumbar supports are designed for average torso lengths, which leaves tall and petite individuals searching for solutions that actually reach the right spot. If you are taller than six feet, your lumbar curve sits higher on your spine, meaning most standard cushions will land too low unless you raise your seating position with a thick seat cushion or purchase an extra-tall model. Look for products specifically labeled for tall users, which typically add two to three inches of vertical coverage.
Petite users face the opposite problem. Standard cushions often extend past the lumbar region and press against the ribcage, creating the exact thoracic over-arch discussed earlier. If your lumbar support seems too large or reaches too high, try rolling the bottom portion of a cylindrical roll inward to reduce its profile.
Some manufacturers offer petite-specific models with shorter contact surfaces. Until you find one, experiment with positioning the cushion higher on your back and angling it slightly to match your unique proportions.
Body type affects more than just vertical placement. Wider torsos benefit from broader cushions that distribute pressure across a larger surface area. Narrow frames may find wide cushions create uncomfortable edge pressure on the sides.
Take your measurements into account when selecting a product rather than defaulting to the most convenient option available.
Safety and When to Seek Medical Guidance
Lumbar support is generally safe for healthy individuals when used correctly, but certain red flags warrant immediate professional evaluation rather than continued self-management. Knowing when to step back and consult a healthcare provider protects you from turning a manageable discomfort into a serious complication.
Signs You Should Stop Using a Lumbar Support Immediately
Stop using the cushion and seek medical attention if you experience any of the following symptoms while seated with support: sharp or stabbing pain in the lower back, pain that radiates down one or both legs, numbness or tingling in the legs or feet, loss of bowel or bladder control, sudden weakness in your legs, or pain that worsens steadily rather than improving over multiple days of consistent use. These symptoms suggest nerve involvement or structural issues that require diagnostic imaging and professional treatment.
Mild discomfort during the initial adjustment period is normal. Your back may feel unusual for the first one to three days as muscles and ligaments adapt to a new postural position. This adjustment soreness should feel similar to the delayed onset muscle soreness you experience after beginning a new exercise routine.
It should gradually fade, not intensify. Sharp pain, neurological symptoms, or escalating discomfort that persists beyond three days is never part of normal adaptation. Do not ignore it.
Conditions That Require Professional Advice First
Several medical conditions change the risk calculus around lumbar support use. Herniated or bulging discs, spinal stenosis, spondylolisthesis, scoliosis with significant curvature, osteoporosis with vertebral fractures, recent spinal surgery, and inflammatory conditions like ankylosing spondylitis all require individualized guidance before introducing any form of postural support. What helps one condition may harm another, and self-treating based on general advice carries real risks.
If you fall into any of these categories, schedule a consultation with your physician or a physical therapist before purchasing or using lumbar support. They can evaluate your specific spinal mechanics, review any imaging results, and recommend either a clinically appropriate device or a structured rehabilitation program tailored to your condition. Do not assume that what worked for a friend with lower back pain will work safely for you.
Spinal anatomy and pathology vary too widely for generic recommendations to apply universally.
Who Should Be Cautious (Osteoporosis, Recent Surgery, Disc Issues)
Individuals with osteoporosis face unique risks because weakened vertebrae can fracture under excessive compressive force. Aggressive lumbar support that pushes hard against the spine could theoretically contribute to vertebral compression fractures in severe cases. If you have been diagnosed with low bone density, choose the softest appropriate support and minimize the pressure applied.
Report any new back pain to your doctor promptly.
Recent surgical patients must follow their surgeon’s specific post-operative instructions regarding sitting and support devices. Some procedures involve implants or fusion hardware that alter spinal mechanics permanently. Others involve tissue healing that requires restricted movement during recovery.
Using the wrong type of support too soon can disrupt the healing process or compromise surgical outcomes. Wait for explicit clearance from your surgical team before introducing lumbar support into your routine.
People with known disc issues should avoid positions that increase posterior disc pressure. Certain cushion designs that force excessive lordosis may worsen disc protrusion symptoms in susceptible individuals. A neutral or mildly supportive position usually proves safer than aggressive curve restoration.
Start conservatively and build tolerance gradually rather than committing to maximum support from day one.
How to Maintain Your Lumbar Support Over Time
Proper maintenance extends the functional life of your lumbar support and preserves its effectiveness. A neglected cushion degrades quietly, losing shape and support long before you realize it is no longer doing its job. Establishing simple care habits costs almost nothing and prevents the disappointment of investing in a product that stops working months sooner than expected.
Fluffing and Rotating Your Cushion
Memory foam and latex cushions benefit from regular rotation to prevent uneven wear patterns. Turn the cushion end-to-end every one to two weeks so each section experiences equal compression over time. This simple habit distributes the load more evenly and delays the development of permanent flattened zones.
Hollow fiber pillows require more aggressive intervention. Fluff and shake them vigorously every morning to redistribute the filling before it settles into dense clumps.
Inflatable cushions need periodic pressure checks even when not in active use. Air slowly permeates through the material over days and weeks, reducing support level gradually. Inflate to your desired firmness, then check again the next morning.
If the pressure has dropped noticeably, top it off. Repeat this process for the first week of use until you establish how quickly your particular model loses pressure. Most quality air cushions stabilize after five to seven days and require topping off only every few days thereafter.
Cleaning and Care
Check the manufacturer’s care label before washing any cover. Most lumbar cushions feature removable zippered covers made from machine-washable fabrics. Wash on a gentle cycle with cold water and air dry completely before reinstalling.
Never put a damp cover back on the cushion, as moisture trapped inside foam promotes mold growth and unpleasant odors within days.
Non-removable covers require spot cleaning only. Dampen a clean cloth with mild soap and water, gently blot the soiled area, then allow it to air dry fully in a well-ventilated space away from direct sunlight. Sunlight degrades foam over time and causes fabric fading and brittleness.
Never submerge a foam cushion in water or run it through a washing machine. The foam will absorb water, become excessively heavy, and take days or weeks to dry completely, creating ideal conditions for bacterial and mold proliferation inside the core material.
Keep the cushion away from sharp objects, pet claws, and excessive heat sources. A single puncture can ruin an inflatable cushion instantly. Rough handling accelerates fabric wear and compromises the structural integrity of the support over months of use.
Treat it with the same care you would give any investment in your health and comfort.
When It’s Time to Replace Your Support
Most lumbar cushions lose effective support within one to three years of regular daily use, depending heavily on material quality and usage intensity. The visual and physical signs of degradation are usually unmistakable once you know what to look for. Memory foam that no longer rebounds when pressed indicates cell structure failure.
The cushion may still feel soft, but it lacks the resilience needed to maintain your spinal curve against gravity throughout the day.
Inflatable cushions develop persistent leaks that cannot be reliably sealed, especially around valve areas and seam joints. If you find yourself inflating the cushion multiple times per day to maintain adequate support, it is time to replace it. Cheap air valves degrade faster than the chamber itself, making replacement more practical than repair.
Hollow fiber fills compress permanently after approximately six to twelve months of daily use. The fibers break down and lose their ability to spring back, leaving you with a flat, unresponsive cushion that provides zero structural support. At that point, you are merely sitting on a decorative pillow with pretensions of ergonomics.
Upgrade to a higher-density foam or latex model if you want lasting performance.
| Material | Typical Lifespan | Key Failure Signs | Replacement Priority |
|---|---|---|---|
| Low-density memory foam | 6 to 12 months | Permanent flattening, no rebound | High |
| High-density memory foam | 2 to 3 years | Slow compression loss, surface tearing | Medium |
| Latex | 3 to 5 years | Cracking, crumbling, loss of elasticity | Low |
| Inflatable air | 1 to 2 years | Persistent leaks, valve failure | High |
| Hollow fiber fill | 6 to 12 months | Complete compression, no recovery | High |
Investing in a quality cushion from the start saves money and frustration compared to replacing cheap models repeatedly throughout the year. The upfront cost difference is usually justified within the first year of use alone.
Cost, Lifespan, and What Actually Is Worth Buying
Lumbar support products range from budget department-store options to premium ergonomic investments priced at several hundred dollars. Price alone does not guarantee effectiveness, but extremely cheap options consistently underperform across every durability and support metric. Understanding what drives cost differences helps you make informed purchasing decisions without falling for marketing inflated pricing.
Price Ranges and Quality Indicators
Budget lumbar cushions under thirty dollars typically use low-density foam or hollow fiber fills with basic fabric covers. These options provide minimal support and degrade rapidly under daily use. They may function adequately for occasional use or short car trips, but they fail to deliver the consistent postural benefits required for full workdays.
Do not expect lasting value from this price tier if you plan regular daily use.
Mid-range options between thirty and seventy dollars generally offer higher-density foam, improved covers with ventilation features, and better construction quality overall. This tier represents the sweet spot for most users seeking reliable daily support without paying premium prices. Look for densities of four pounds per cubic foot or higher, ventilated mesh covers, and non-slip bases as standard features in this price band.
Premium cushions above seventy dollars often incorporate advanced materials like gel-infused foam, medical-grade latex, or precision-engineered adjustable systems. These products excel in durability, temperature regulation, and customizable positioning. They justify their higher cost primarily through longer lifespan and superior materials rather than dramatically different ergonomic principles.
If you sit eight hours daily and plan to use the cushion for multiple years, the premium option often proves more economical over time despite the higher initial outlay.
Foam Density and How It Affects Durability
Foam density directly correlates with how long a cushion maintains its supportive properties. Density measures how much foam material exists within a given volume, expressed in pounds per cubic foot. Higher density foam contains more polymer cells packed into the same space, creating a stronger structure that resists compression set over repeated loading cycles.
Low-density foam has fewer cells and larger air gaps, causing it to collapse and lose resilience much faster under sustained weight.
Four-point-zero pounds per cubic foot serves as the practical minimum threshold for daily-use lumbar support. Anything below that rating will show noticeable flattening within three to six months of regular sitting. Five-point-zero density foam maintains effective support for two to three years under comparable conditions.
Six-point-zero and above enters medical-grade territory with lifespans approaching five years or more, though these firmer options may feel uncomfortably rigid initially for lighter individuals.
Density ratings sometimes appear alongside ILD numbers, which measure indentation force load deflection and indicate firmness rather than longevity. A high-density foam can still be manufactured to feel soft if the ILD rating is low. For durability, prioritize density first.
Firmness preference is secondary and can often be adjusted through positioning or layered padding.
Realistic Lifespan Expectations by Material
Memory foam cushions in the three to five pound density range typically deliver eighteen to thirty-six months of effective support under daily eight-hour use. Above five pounds, lifespan extends to three to five years. Latex cushions consistently outlast memory foam in the same usage conditions, often reaching four to six years before significant compression degradation appears.
Gel-infused variants follow the same timelines as their base foam categories, with gel adding temperature regulation rather than extending durability.
Inflatable air cushions present a different durability profile. The chamber material itself may last several years, but valves and seams represent weak points that fail unpredictably. Most users replace inflatable models every one to two years due to gradual pressure loss or sudden valve failures that render the product unusable.
Budget models often fail within six months.
Hollow fiber pillows degrade the fastest, usually losing majority support within six to nine months of daily use. The fibers mat together and refuse to redistribute, leaving dense compacted zones and thin unsupported areas. Unless you need a disposable temporary solution, this category rarely justifies the expense compared to foam alternatives.
| Material | Typical Lifespan | Key Failure Signs | Replacement Priority |
|---|---|---|---|
| Low-density memory foam | 6 to 12 months | Permanent flattening, no rebound | High |
| High-density memory foam | 2 to 3 years | Slow compression loss, surface tearing | Medium |
| Latex | 3 to 5 years | Cracking, crumbling, loss of elasticity | Low |
| Inflatable air | 1 to 2 years | Persistent leaks, valve failure | High |
| Hollow fiber fill | 6 to 12 months | Complete compression, no recovery | High |
Investing in a quality cushion from the start saves money and frustration compared to replacing cheap models repeatedly throughout the year. The upfront cost difference is usually justified within the first year of use alone. Look for ergonomic solutions designed for long-term spine health when evaluating whether a higher initial investment makes sense for your specific situation and usage patterns.
Expert Tips for Maximizing Lumbar Support Effectiveness
Getting good lumbar support is straightforward. Getting maximum benefit from it requires a few advanced techniques most people never discover. These tips separate casual users who get mild relief from people who completely transform their sitting experience and eliminate chronic discomfort.
Match Your Sleep Posture to Your Daytime Setup
Your sleeping position affects how your lumbar spine recovers overnight. Side sleepers benefit from placing a thin pillow between their knees to keep the pelvis neutral. This prevents the top leg from dragging the spine sideways and undoing the alignment work your lumbar support did during the day.
Stomach sleepers should place a flat pillow under their hips rather than their head to reduce lumbar arching.
Back sleepers generally maintain the best overnight spinal alignment automatically. A thin pillow under the knees can slightly reduce lower back pressure by tilting the pelvis backward just enough to flatten the curve minimally. This position complements daytime lumbar support by allowing the spine to rest in a relaxed state rather than fighting gravity all night.
Combine Lumbar Support With Targeted Stretching
Lumbar support addresses one piece of the posture puzzle. Without complementary stretching, tight hip flexors and hamstrings will slowly pull your pelvis out of alignment no matter how well-positioned your cushion is. Tight hip flexors tilt the pelvis forward excessively, creating an exaggerated lumbar arch that no cushion can fully counteract.
Stand in a doorway with one foot forward and lean gently into the stretch until you feel it in the front of your hip. Hold for thirty seconds per side. Repeat three times daily for noticeable improvement within two weeks.
Hamstring stretches produce similar benefits by allowing the pelvis to tilt more freely into the neutral position your lumbar support encourages.
Use the Three-Point Sitting Check
Professionals in ergonomics use a simple three-point contact principle to verify proper seating. You should maintain consistent contact between your lower back and the lumbar support, your sit bones and the seat surface, and your feet flat on the floor. If any of these three points lose contact, your entire posture chain destabilizes.
Check these contacts every hour as part of your standing break routine. Slide forward if your lower back loses touch with the support. Lift your heels if your feet stop pressing firmly into the floor.
Both adjustments reset the kinetic chain and restore the mechanical advantage your lumbar support provides.
Layer Support Strategically for Severe Cases
People with significant postural issues sometimes need multiple support points working together. A lumbar cushion addresses the lower back. A small rolled towel placed at the thoracic curve (upper back) can prevent slouching that undermines lumbar support efforts.
These two supports work synergistically when positioned correctly.
Do not layer more than two supports simultaneously. Additional cushions create competing pressure points that confuse your spine’s natural alignment. The goal is balanced support, not rigid immobilization.
If you find yourself needing three or more support devices, consult a physical therapist rather than continuing to self-adjust.
Track Your Progress With Simple Metrics
Objective tracking prevents you from ignoring gradual improvements or dismissing a support system that actually works. Note your pain level on a zero to ten scale before and after using proper lumbar support each day. Record how many minutes you can sit comfortably before needing to adjust your position.
After two weeks, compare the numbers. Improved metrics indicate correct positioning and appropriate support type. Worsening or unchanged numbers suggest you need to reassess your setup, try a different cushion, or seek professional evaluation.
Most users see meaningful improvement within fourteen days of consistent correct usage.
Troubleshooting Guide for Common Lumbar Support Issues
Even with perfect positioning knowledge, real-world variables create problems. Your chair might have quirks, your body might shift, and environmental factors change over time. Having a systematic troubleshooting approach saves hours of frustration and prevents you from abandoning lumbar support entirely when a simple adjustment would solve everything.
The Cushion Keeps Sliding Down
Gravity wins against friction eventually. Most standard cushions slide down mesh backs and smooth leather within minutes of sitting. Non-slip silicone strips on the cushion backside help but rarely solve the problem completely on challenging chair surfaces.
Strap-based cushions lock directly onto the chair frame and eliminate sliding entirely. Clip-on designs attach to existing chair frames without tools and work across multiple chair types. For persistent sliding problems on mesh chairs, look for products specifically engineered with aggressive mesh-gripping textures on the backing.
These use interlocking polymer bars that bite into mesh weave patterns rather than relying on surface friction alone.
You Feel Pressure Points Instead of Even Support
Pressure points indicate the cushion shape does not match your spinal contour. Kidney-shaped or contoured wedges distribute pressure across the widest part of your lumbar region. Round cylindrical rolls concentrate force along a narrow line that creates hot spots over time.
Flip your cushion if it has a distinct top and bottom contour. Many users unknowingly install contoured supports backwards, placing the narrower edge against their spine instead of the wider supportive curve. Rotate the cushion ninety degrees if the width feels too narrow for your back.
Some adjustable models allow you to reshape the profile manually by pressing the edges inward or outward until the curvature matches your anatomy.
Your Shoulders Hike Up After Twenty Minutes
Shoulder elevation signals the lumbar support is positioned too high or pushing too aggressively. When the cushion sits above your natural lumbar curve, it forces your thoracic spine into compensation. Your shoulders rise involuntarily as your upper back tries to counterbalance the artificial arch below it.
Lower the cushion by one full inch and retest. If shoulder height normalizes within five minutes, you found the problem. If shoulders remain elevated after lowering, check whether your monitor height forces you to crane your neck forward.
Screen positioning often creates shoulder tension that users mistakenly blame on lumbar support placement.
Your Lower Back Feels No Difference After Adjustment
No perceptible change suggests either incorrect positioning or inadequate support from the product itself. Return to the ten-minute verification test described earlier and confirm each checkpoint. If placement checks out perfectly and you still feel nothing, the cushion lacks sufficient density or protrusion for your body weight.
Heavier individuals often need denser foam or inflatable options they can pressurize heavily. Lighter individuals may compress firm cushions completely, creating the illusion of no support when the cushion is actually bottoming out against the chair. Try a softer model or reduce inflation pressure if you fall into the lighter category.
Pain Increases Rather Than Improves After One Week
Worsening symptoms after seven days of consistent correct use warrants immediate attention. The initial adjustment period spans two to three days maximum. Beyond that, progressive discomfort indicates either an underlying condition requiring medical evaluation or a fundamental mismatch between the support type and your needs.
Switch to a gentler support temporarily and reduce wear time to twenty-minute intervals. If pain decreases during these shorter sessions, your spine simply needs gradual acclimation. Build up duration slowly over two weeks rather than attempting full-day use immediately.
If pain persists despite shortened sessions and gentler support, discontinue use and consult a healthcare provider before trying alternative approaches.
The Science Behind Lumbar Support and Spinal Health
Understanding the biomechanics behind lumbar support transforms it from a comfort accessory into a legitimate ergonomic intervention. This knowledge helps you make informed decisions rather than following generic advice blindly. It also explains why certain positioning errors cause real structural damage while others merely create temporary discomfort.
Intravertebral Pressure During Sitting Versus Standing
Dr. Stuart McGill, a leading spine researcher at the University of Waterloo, published foundational measurements of spinal disc pressure across different postures. Standing exerts baseline pressure of approximately one hundred percent on lumbar discs.
Sitting upright without support increases that pressure to roughly one hundred forty percent. Adding proper lumbar support while sitting reduces pressure back down toward one hundred ten percent, nearly matching standing levels.
This one hundred forty percent spike without support explains why prolonged sitting feels progressively harder on your lower back. The discs absorb excess load with each passing hour, pushing fluid outward and weakening the annulus fibrosus over months and years. Proper lumbar support mitigates this effect significantly but does not eliminate it entirely, which is why standing breaks remain essential even with optimal cushioning.
Muscle Activation Patterns With and Without Support
Electromyography studies reveal how lumbar support changes muscle recruitment patterns during sitting. Without support, erector spinae muscles along the spine activate continuously at forty to sixty percent of maximum voluntary contraction just to maintain basic upright posture. This constant low-level activation fatigues muscles within ninety minutes and triggers protective spasms that manifest as lower back stiffness and pain.
With correctly positioned lumbar support, erector spinae activation drops to fifteen to twenty-five percent of maximum effort. The support carries most of the structural load that muscles would otherwise manage alone. Reduced muscle fatigue translates directly into less end-of-day back ache and fewer compensatory movements that create secondary strain patterns throughout the kinetic chain.
Long-Term Disc Health Implications
Chronic disc dehydration from repeated flexion loading represents one of the most common degenerative spinal conditions in sedentary populations. When discs experience sustained posterior pressure from flattened lumbar curves, nucleus pulposus material gradually migrates backward toward the vulnerable outer annulus fibers. Over decades, this migration weakens disc walls and predisposes individuals to bulging or herniation.
Proper lumbar support maintains disc-neutral geometry throughout sitting periods, reducing backward fluid migration and preserving annular integrity. Longitudinal ergonomic studies suggest workers using correct lumbar support show measurably slower degenerative disc progression compared to matched controls without support, though results vary based on overall activity levels and core strength.
The Pelvic Tilt Mechanism Explained
Your lumbar curve exists because of pelvic positioning. Anterior pelvic tilt, where the front of your hip bones rotate downward, creates the inward lumbar arch. Posterior pelvic tilt, where the hip bones rotate upward, flattens the curve.
Sitting in soft furniture encourages posterior tilt, which is the primary mechanical cause of lumbar flattening during sedentary behavior.
Lumbar support works by physically preventing the pelvis from rolling into posterior tilt. The cushion acts as a proprioceptive cue and mechanical block simultaneously. Your body senses the contact point and subconsciously adjusts pelvic position to maintain that contact.
This neuromuscular feedback loop reinforces healthier sitting mechanics even after you remove the cushion, provided you practice consciously maintaining the supported posture.
Integrating Lumbar Support Into Your Daily Routine
Lumbar support delivers value only when used consistently and correctly. Sporadic use or incorrect positioning wastes the investment and reinforces bad habits. Building sustainable routines ensures the support becomes invisible infrastructure rather than a daily chore requiring negotiation and adjustment.
Morning Setup Ritual
Create a consistent morning seating ritual that takes less than two minutes but guarantees correct positioning every single day. Adjust chair height so feet rest flat with thighs parallel to the floor. Set lumbar support height to the belt-line position you identified earlier.
Verify seat depth allows the two-to-four-inch knee clearance rule. Run through the ten-minute comfort test before opening your laptop or starting work tasks.
Perform this sequence identically each morning. Consistency builds muscle memory, and after three to four weeks, you will position yourself correctly without conscious thought. Skipping the routine occasionally leads to subtle drift, and you will notice increased afternoon discomfort as proof that consistency matters more than perfection.
Afternoon Reassessment Protocol
Your body settles differently after four hours of sitting compared to the fresh morning position. Pelvic ligaments relax under sustained load, and you may silently slide forward or rotate slightly in the chair. A brief afternoon check prevents compounding errors.
At noon or early afternoon, stand up and shake out your legs. Sit back down deliberately and run through a quick three-point contact check. Feel whether your lower back maintains contact with the support.
Verify your feet remain planted. Confirm your sit bones feel evenly weighted. Small midday corrections prevent the afternoon slump that derails hours of good morning positioning.
Travel and Temporary Seating Adaptation
Hotel chairs, rental cars, restaurant booths, and airplane seats rarely provide adequate lumbar support. Carry a compact travel cushion specifically for these situations. Compact inflatable models deflate to pocket size and reinflate in seconds.
Rolled memory foam models compress flat and secure with elastic straps.
Position the travel cushion using the same belt-line rule regardless of chair type. Hotel desk chairs often have rigid fixed backs that cannot adapt. A portable cushion bridges the gap between your spine and an unforgiving seat geometry.
The difference between pain-free travel and miserable journeys often comes down to whether you bring portable support or resign yourself to whatever the venue provides.
Work-from-Home Permanent Setup
Remote workers face unique challenges because home environments rarely offer corporate-grade ergonomic equipment. Dining chairs, kitchen stools, and sofa corners become default seating without intentional intervention. Treat your home workspace with the same seriousness as a traditional office setup.
Designate one chair exclusively for computer work and outfit it properly with lumbar support, appropriate seat height, and monitor positioning. Avoid alternating between multiple unsupported surfaces throughout the day. Every position switch resets your neuromuscular adaptation and forces your body to readjust constantly.
Permanent dedicated setups produce measurably better posture outcomes than rotating between inadequate options.
Weekend and Leisure Seating Considerations
Weekend relaxation does not require formal lumbar support protocols, but persistent poor posture on sofas and recliners reinforces the same flattening mechanisms you fight during work hours. If you watch television for extended periods, place a rolled towel or small cushion behind your lower back on the couch. The gesture takes two seconds and maintains spinal awareness during leisure time.
Recliners with built-in lumbar support often position that support correctly for reclined angles but fail when you sit upright in the same chair. If you alternate between reclined and upright positions in a recliner, verify the support stays aligned with your lumbar curve in both configurations. Some reclining mechanisms shift the backrest angle independently of the lumbar contact point, creating misalignment during position transitions.
Long-Term Strategies for Back Health Beyond Lumbar Support
Lumbar support addresses sitting-related spinal stress, but comprehensive back health requires a multi-dimensional approach. No cushion replaces muscular strength, cardiovascular fitness, or habitual movement. The most effective long-term strategy combines correct support use with proactive physical conditioning and lifestyle modifications that address root causes rather than symptoms alone.
Core Strengthening as the Foundation
Strong abdominal and back muscles create a natural internal corset that stabilizes the spine independently of external support. Planks, bird dogs, dead bugs, and modified curls build this internal support system progressively. Start with two to three sessions weekly and gradually increase volume as strength improves.
Consistent core training reduces reliance on lumbar cushions over time as your body develops autonomous postural stability. You may still use support during extended sitting, but the cushion becomes auxiliary rather than essential. This progression mirrors rehabilitation protocols used by physical therapists treating chronic lower back pain patients, who typically emphasize strengthening before introducing external support devices.
Daily Movement Prescription
The single most impactful habit for spinal health is frequent positional variation. Standing, walking, stretching, and shifting positions every thirty to forty-five minutes eliminates the cumulative loading damage that causes most degenerative disc disease. Lumbar support reduces strain during necessary sitting periods.
Movement eliminates the need for continuous sitting in the first place.
Aim for a minimum of seven thousand steps daily, though ten thousand remains the general target for optimal metabolic and musculoskeletal health. Break sedentary blocks throughout the day with brief walks, even two-minute trips to refill water or stretch near the window. These micro-movements accumulate significantly over a full week and produce measurable differences in back pain prevalence statistics.
Weight Management and Spinal Loading
Body weight directly multiplies the force experienced by lumbar discs during sitting. Each extra pound of body mass generates approximately three pounds of additional compressive force on the L4-L5 segment when seated. Losing twenty pounds reduces lumbar disc load by roughly sixty pounds during every sitting session, dramatically decreasing cumulative tissue stress over months and years.
Nutrition and resistance training combined produce the most sustainable weight management outcomes. Crash diets fail because they sacrifice muscle alongside fat, weakening the very structures that protect your spine. Balanced caloric reduction paired with progressive strength training preserves lean mass while reducing unnecessary load, creating a dual benefit for spinal health.
Sleep Hygiene and Recovery Optimization
Sleep quality determines how effectively your spinal tissues repair daily micro-damage from mechanical loading. Poor sleep increases inflammatory markers and reduces pain tolerance, making even well-supported sitting feel more uncomfortable than it objectively is. Target seven to nine hours of quality sleep nightly using consistent bedtime routines and dark cool bedroom environments.
Sleeping surface matters less than most people assume. Medium-firm mattresses generally outperform both extremely soft and extremely firm options for spinal alignment across all sleeping positions. If you currently wake with increased back stiffness, experiment with mattress toppers or position adjustments before purchasing an entirely new bed.
Small modifications often resolve sleep-related morning pain without major investment.
Stress Management and Muscle Tension Reduction
Psychological stress manifests physically as increased muscle tone, particularly in the trapezius, rhomboids, and erector spinae groups. Chronic stress keeps these muscles partially contracted around the clock, reducing blood flow and accelerating fatigue during seated work. Meditation, breathing exercises, and dedicated relaxation time lower baseline muscle tension and improve how your body responds to ergonomic interventions.
Progressive muscle relaxation practiced for ten minutes daily reduces perceived back pain intensity in clinical studies by approximately thirty percent compared to control groups. Combine this technique with proper lumbar support and you address both the mechanical and neurological components of chronic back discomfort. The synergy between posture correction and stress reduction produces outcomes neither strategy achieves alone.
When to Upgrade Your Entire Seating Solution
Sometimes lumbar support cannot overcome fundamentally flawed seating geometry. Chairs with excessively deep seats, non-adjustable backs, or collapsed cushioning create mechanical disadvantages no aftermarket cushion can fully neutralize. If you consistently cannot achieve the three-point contact principle despite diligent positioning efforts, your chair itself is the limiting factor.
Upgrading to a properly adjustable ergonomic chair addresses root geometry problems rather than compensating for poor design. The investment ranges widely, but professional-grade ergonomic chairs typically last seven to ten years with minimal degradation, making the annualized cost competitive with repeatedly replacing inferior cushions. Consider evaluating ergonomic chair options to determine whether an upgrade delivers better long-term value than continued cushion supplementation.
Frequently Asked Questions
Can lumbar support damage my spine if used incorrectly?
Yes, improper positioning can temporarily worsen back pain and create new tension patterns. Placing the cushion too high forces your thoracic spine into an exaggerated outward arch. Positioning it too low leaves your lumbar curve completely unsupported.
Over-inflation creates excessive pressure that strains facet joints and surrounding ligaments. These issues are usually reversible once you correct the positioning or discontinue use. Chronic damage from brief misalignment is extremely rare in otherwise healthy spines.
Seek medical evaluation if sharp pain, numbness, or radiating symptoms persist beyond three days after correcting placement.
Should I use lumbar support while driving?
Absolutely. Driving flattens the lumbar curve more aggressively than desk sitting due to the open hip angle created by car seat positioning. Road vibrations also transmit through the seating surface and increase spinal loading with every bump.
A properly positioned lumbar cushion counters both effects simultaneously. Choose a travel-friendly model with non-slip backing that stays secure during acceleration and braking. Inflatable or compact memory foam options work best for vehicle use since they store easily when not needed.
How do I know if my chair already has enough built-in support?
Sit all the way back in the chair with your shoulders relaxed and feet flat. Feel whether your lower back maintains a natural inward curve or if a gap opens between your spine and the seat back. If you can slide your hand horizontally behind your lower back with room to spare, the built-in support is insufficient.
If your lower back presses firmly against the backrest with no gap, the support may already be adequate. Adjustable built-in systems should allow you to fine-tune height and depth until the contact feels even and comfortable across your entire lumbar region. Poor built-in support combined with a quality aftermarket cushion typically yields better results than relying on fixed inadequate structures alone.
Can lumbar support fix poor posture permanently?
No. Lumbar support addresses the mechanical consequences of sitting poorly. It does not retrain the neuromuscular patterns that cause slouching in the first place.
Permanent posture improvement requires consistent core strengthening, regular movement breaks, and conscious postural awareness throughout the day. Think of lumbar support as a training wheel, not a cure. It reduces strain while you build the muscular foundation necessary to maintain good posture independently.
Eventually, many users can reduce reliance on the cushion as their core strength improves. The support remains valuable during periods of heavy sitting or when traveling between strengthening sessions.
Is memory foam or latex better for lower back pain?
Neither material is universally superior. Memory foam conforms more closely to individual spinal contours, making it excellent for asymmetric curves or localized pressure relief. Latex provides more consistent uniform support with greater inherent elasticity, which many users find more comfortable during extended sitting sessions.
Latex also resists heat retention better than memory foam, staying cooler throughout long workdays. If you have specific asymmetrical curvature issues, memory foam may feel more accommodating. If you prefer consistent firmness and cooler sitting, latex likely serves you better.
Both materials perform well when selected at appropriate density levels and positioned correctly.
How long should I sit with lumbar support before taking a break?
Limit continuous sitting to thirty to forty-five minutes even with optimal lumbar support. The support reduces strain, but it does not eliminate the physiological downsides of prolonged static posture. Blood flow decreases, disc hydration shifts unfavorably, and muscles stiffen regardless of how well positioned your cushion is.
Stand, walk, or stretch for at least two minutes before resuming sitting. This break interval aligns with occupational ergonomic guidelines from NIOSH and the American College of Sports Medicine. Research published in the Journal of Electromyography and Kinesiology confirms that periodic posture changes significantly reduce cumulative spinal loading compared to sustained seated positions, even with proper support.
You can achieve better results by combining correct lumbar positioning with regular movement than by relying on support alone throughout long uninterrupted sitting periods.