You’re holding a tape measure and staring at a chair that could go a dozen different directions. Figuring out how to measure a chair becomes messy fast when you don’t know which numbers actually matter for what you’re doing. Most people grab the wrong measurements and end up with slipcovers that gap, cushions that slide off, or furniture that won’t fit through the doorway.
Per GSA furnishings specifications, a standard dining chair seat sits between 17 and 19 inches high, measures 16 to 20 inches wide, and runs 18 to 22 inches deep, but those are starting points, not rules. The real answer depends entirely on why you’re measuring in the first place. A slipcover tailor needs completely different numbers than someone checking if a chair clears a staircase.
Once you lock in your goal, the measurement path becomes straightforward.
Quick Answer
To measure a chair accurately, start with the seat width, depth, and height. Then record the back height, overall width, and arm dimensions. Always note whether you’re measuring the bare frame or the upholstered surface.
Your end goal determines which numbers matter most.
The Short Answer: What You Need to Know Right Now
Here’s the core of it. You need six to eight measurements depending on your project, and the order matters more than most guides admit. Start with the seat because every other measurement references it.
Then work outward to the back, arms, and overall dimensions. Stop when you have what your specific task requires.
Most online templates hand you a one-size-fits-all list. That approach fails because a slipcover company wants the bare frame under the cushion, while a room planner needs the full upholstered footprint. Knowing which version applies to you saves time, fabric, and frustration.
We’ll walk through each step below, but the single biggest insight is this: write down your goal before you pick up the tape. Everything else follows from there.
Why Your Goal Changes the Entire Process
This is where most people go wrong. They measure every dimension they can find and then realize they missed the one number that actually matters for their project. Your end goal dictates your measurement plan, not the other way around.
Slipcover orders require bare-frame measurements. Manufacturers stitch covers to the frame, not the cushion bulge. If you measure over the upholstery, the cover will ride high and leave gaps along the sides. Remove loose cushions first.
Measure the wood or metal frame where the seat cushion sits.
Replacement cushions need upholstered measurements. Here you want the full padded surface. A cushion ordered to bare-frame specs will slide around and look undersized. Measure the seat width across the top of the existing cushion, the depth from front edge to backrest, and the thickness from bottom to top.
Room layout and clearance checks demand overall dimensions. You’re verifying fit, not ordering parts. Measure the chair exactly as it sits. Add 6 to 12 inches of clearance behind dining chairs for pulling out and walking space, per National Kitchen and Bath Association layout guidelines.
Reupholstery projects split the difference. You need frame measurements for the new fabric cut and upholstered measurements for matching existing proportions. Photograph the current setup before stripping anything. Note spring patterns, foam density zones, and any tufting that affects dimensions.
| Your Goal | What You Measure | What You Skip |
|---|---|---|
| Slipcover | Bare frame width, depth, seat height, back height | Cushion thickness, arm upholstery depth |
| Replacement cushions | Upholstered seat width, depth, thickness, back shape | Frame dimensions, leg span |
| Room fit check | Overall width, depth, height, arm projection | Frame vs. upholstery distinction |
| Reupholstery | Both frame and upholstered measurements | Neither — you need both sets |
The decision tree branches here. Pick your scenario and stick to that measurement set. Mixing approaches causes returns and remeasurement delays that cost real money.
If you’re working with accent chairs from a collection like the Dumos Mid Century Accent Chairs, note that mid-century styles often feature tapered legs and exposed frames, making bare-frame measurement even more critical for accurate slipcover ordering.
Tools You Actually Need (and What to Skip)
You don’t need much. A flexible cloth tape measure does the job for 95 percent of chairs. It conforms to curves and doesn’t spring back like a steel tape.
Steel tapes work fine for rigid frames, but they can give inaccurate readings on upholstered surfaces because they bridge over curves instead of following them.
Here’s what to grab and what to leave in the toolbox.
| Tool | Use It For | Skip If |
|---|---|---|
| Flexible cloth tape measure | All upholstered chair measurements | Measuring only bare metal or wood frames |
| Rigid steel tape (12-foot) | Bare frame measurements, leg span | Upholstered surfaces where bridging skews numbers |
| Notebook or phone notes app | Recording each dimension with labels | Relying on memory during a multi-chair project |
| Sketchpad (optional) | Drawing a quick labeled diagram | Working with complex shapes like wingbacks |
| Measuring wheels | Doorway and hallway clearance checks | Indoor furniture measurements |
Skip the laser measurers for chair work. They struggle with soft surfaces and angled edges. Skip digital calipers unless you’re measuring cushion foam thickness to the eighth inch.
Skip anything fancy. A $10 cloth tape and a piece of paper cover every scenario most people face.
One detail worth noting: mark your tape with a pen at key points if you’re measuring multiple chairs of the same model. This saves time and keeps numbers consistent across a set. We’ve seen buyers order six slipcovers and end up with three slightly off because they remeasured each chair from scratch instead of using a reference mark.
Always measure in inches unless you’re working with European manufacturers who specify centimeters. Converting between systems introduces rounding errors that pile up across six measurements. Pick one system and stick with it.
Measuring the Seat: The Foundation of Everything
Everything below this point references the seat. Get these four numbers right and the rest becomes routine. Get them wrong and every downstream measurement wobbles.
Image source: Wikimedia Commons / David (CC BY)
Seat Width and Depth
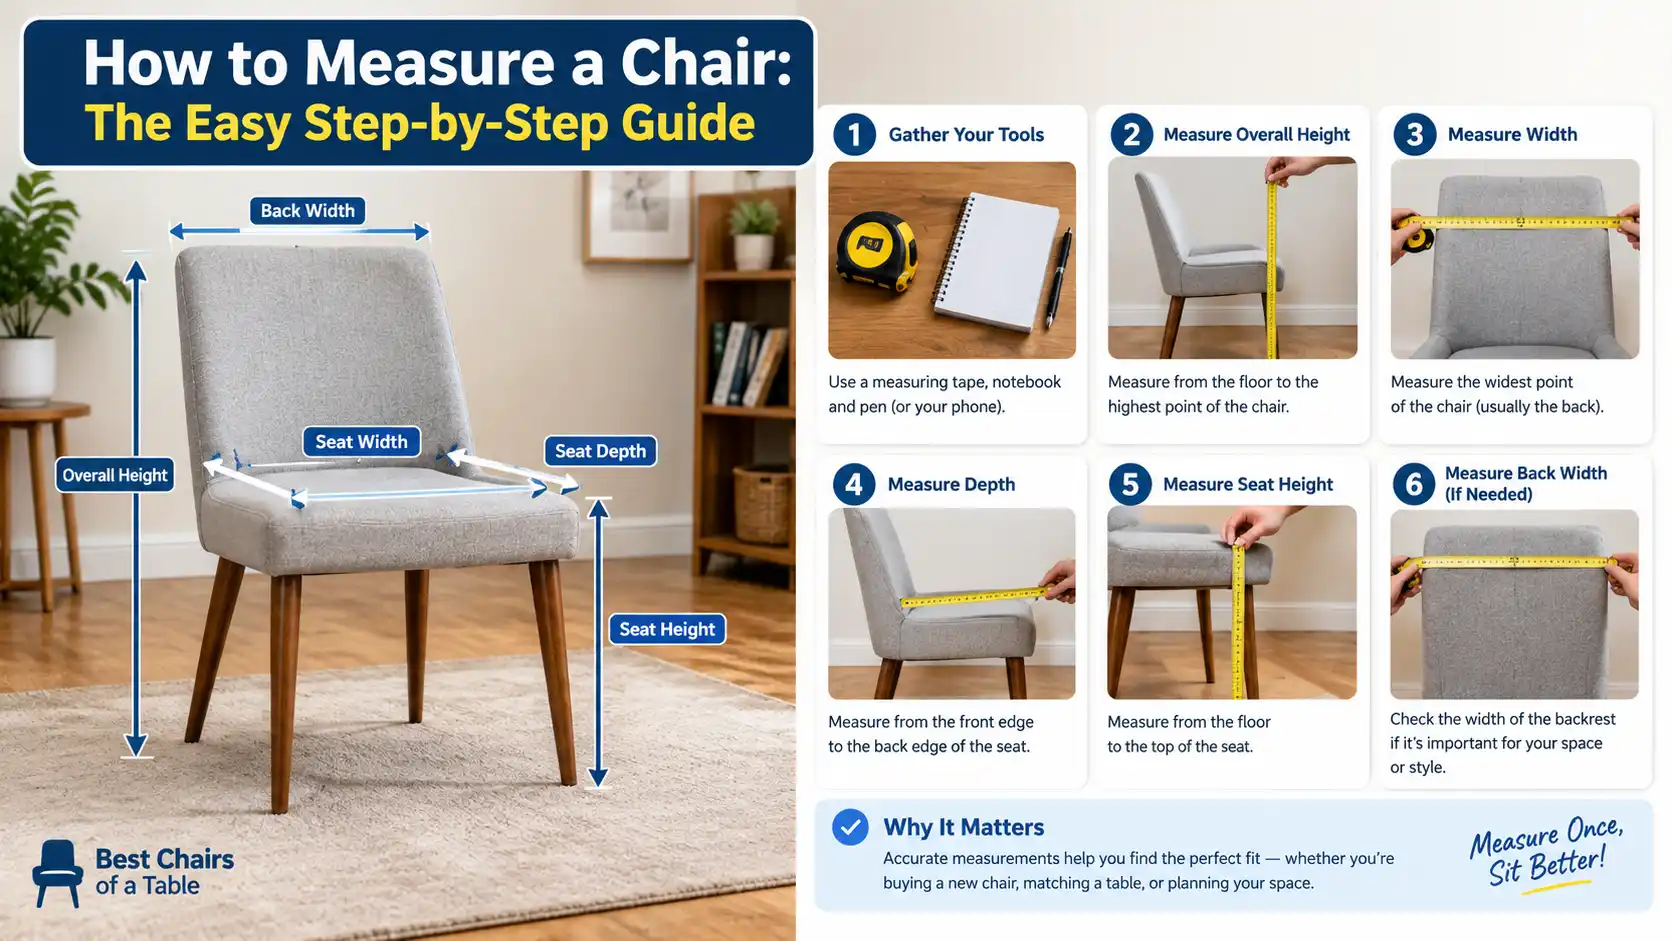
Seat width measures across the sitting surface from one inner edge to the other. Place the tape at the widest point. For square-seat chairs, that’s usually straight across the front.
For tapered seats that narrow toward the back, measure at both the front and the rear and record both numbers.
Most dining chairs range from 16 to 20 inches wide. Armchairs typically span 20 to 26 inches. Oversized models like the Rexulqo Oversized Chair With Seat Storage push past 26 inches and require separate width notes for frame versus cushion.
Seat depth runs from the front edge to where the seat meets the backrest. This number matters more than people realize. A depth under 18 inches feels cramped for taller adults.
Beyond 22 inches and knees stop reaching the front edge comfortably. Standard range sits at 18 to 22 inches.
When measuring depth, account for seat slope. Many chairs tilt the front edge downward by half an inch or so. Lay the tape flat across the surface rather than hanging it vertically.
A sagging tape reads deeper than the actual seat plane.
Seat Height and Thickness
Seat height measures from the floor to the top of the seat surface. Stand the tape straight up against the front edge. Keep the tape perpendicular to the floor, not angled toward the backrest.
An angled tape adds false depth to your reading.
Standard seat height runs 17 to 19 inches. Lower bar-height chairs sit around 24 to 26 inches. Higher counter chairs land near 28 to 30 inches.
If you’re pairing chairs with an existing table or desk, measure that surface too. The standard relationship is a 10 to 12-inch gap between seat top and table underside for comfortable knee clearance.
Seat thickness matters for cushion replacements and slipcover ordering. Measure from the top of the seat frame to the highest point of the cushion. Loose cushions can compress differently over time, so measure uncompressed for accuracy.
Note the thickness at the front, middle, and back of the seat. Foam settles unevenly, and those variations show up in replacement orders.
If your chair has a built-in seat pad rather than a loose cushion, measure the full upholstered height and record it as seat thickness. This helps upholsterers match the original profile when replacing foam layers.
Measuring the Back and Total Height
The back measurements determine whether a slipcover reaches the right point and whether a chair visually balances in your space. These numbers also matter for clearance checks, especially with tall backs against walls.
Back height comes in two forms. Overall back height measures from the floor to the highest point of the backrest. This matters for room layout and visual proportion.
A chair that reads too tall for its surroundings looks awkward regardless of exact dimensions.
Back height from the seat surface measures from the top of the seat to the top of the backrest. This is the number slipcover companies need. It determines how far up the cover climbs and whether it clears the crown of a wingback or rolled back.
Standard back heights range from 30 to 42 inches from the seat surface. Low-back dining chairs sit around 30 to 34 inches. Mid-back chairs land near 34 to 38 inches.
High-back wingbacks and throne-style chairs reach 38 to 42 inches and beyond.
How To Use Lumbar Support Correctly is relevant here because back height directly affects spinal support. A backrest that ends too low leaves the lumbar region unsupported during extended sitting. When measuring for ergonomic purposes, note where the backrest curve intersects the sitter’s lower spine.
Total chair height includes legs and any decorative elements at the top. Measure from the floor to the absolute highest point, including carved details or finials. This number matters for storage, transport, and verifying that a chair fits under shelving or between floating shelves.
For wingback chairs, measure the wing projection from the front of the seat to the outermost point of the wing. This projection adds 3 to 8 inches depending on style and significantly affects overall width calculations for room placement.
Measuring Arms, Legs, and Protruding Parts
Arms and legs get ignored until a cover won’t fit or a chair won’t slide under a table. Measure them early and you’ll avoid costly surprises.
Arm Height and Width
Arm height measures from the top of the seat surface to the top of the armrest. Most standard arms sit between 9 and 11 inches above the seat. If you’re measuring for a slipcover, you need this number to match the sleeve depth.
Arm width runs from the front edge of one arm to the front edge of the other. This is the overall chair width at the arm level. For tapered arms that narrow toward the front, measure at the widest point near the back and at the front edge.
Record both if they differ by more than half an inch.
Arm projection matters for tight spaces. This is the distance from the front of the seat to the furthest forward point of the arm. Deep arm projections can prevent a chair from sliding flush against a table or wall.
| Arm Feature | Where to Measure | Typical Range |
|---|---|---|
| Arm height | Seat surface to arm top | 9–11 inches |
| Overall arm width | Outer edge to outer edge | Varies widely |
| Arm projection | Front of seat to front of arm | 5–9 inches |
Leg Span and Diameter
Leg span determines whether a chair fits under a pedestal table or needs corner clearance. Measure the distance between the outer edges of the front legs and the rear legs separately. Many tables have center pedestals that block corner placement.
Leg diameter matters for replacing glides or caps. Use calipers or a tape wrapped around the leg to find the circumference, then divide by pi. Most dining chair legs range from ¾ to 1½ inches in diameter.
If your chair has non-swing legs or fixed glides, measure the distance from the floor to the bottom of the leg plate. This helps when swapping to rolling casters that change the effective seat height.
For heavier chairs like the Office Chair For Heavy Person, always check the caster load rating before replacing wheels. An underspec caster can crack the base or collapse under weight.
The Slipcover Rule: Frame Measurements vs. Upholstery Measurements
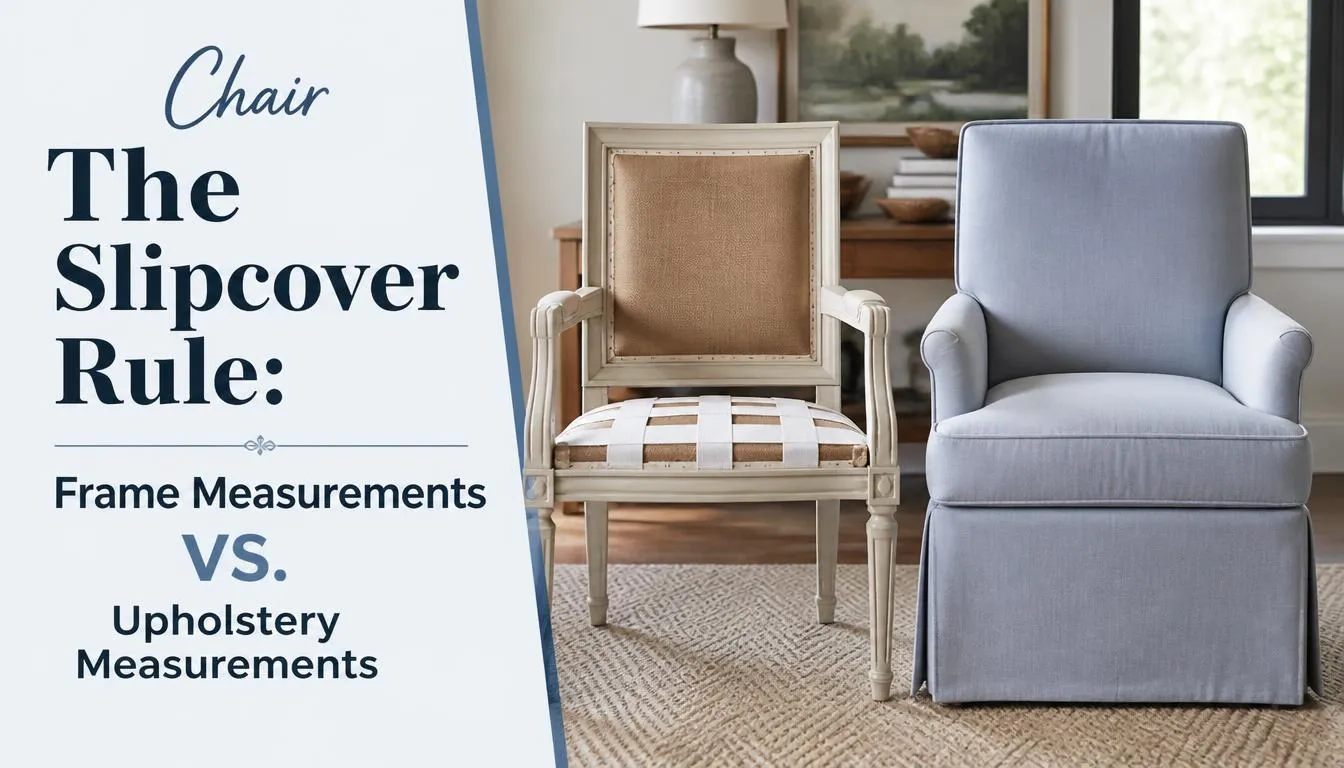
This distinction separates a perfect fit from a return label. Most slipcover companies require bare-frame measurements. CushionReplacement vendors want upholstered measurements.
Mixing them up is the number one cause of wrong-size orders.
When to Measure the Frame
Measure the frame whenever a cover needs to stretch over the existing upholstery. The fabric then rides on the structure underneath, not on the cushion bulge. If you measure over the padding, the cover will sit high and pull away at the sides.
Remove all loose cushions first. Flatten any attached pads as much as possible. Measure the wood or metal surface directly.
Record seat width, depth, and height from the frame itself.
For chairs with tight dust-bottom fabric under the seat, measure the frame edge where the dust cloth meets the wood. Don’t stretch the fabric. A taut dust cover can add a quarter-inch or more to your depth reading.
When to Measure the Upholstery
Measure the upholstery whenever you’re replacing cushions, adding pad, or ordering a cover designed to skim the surface. A “fitted” slipcover that zips around the seat edge needs the padded dimensions.
Measure seat width across the top of the cushion, not at the frame. Measure depth from the front cushion edge to the backrest fabric. Include any tufting or button bumps that add bulk.
Cushion thickness changes over time. Foam compresses and springs lose tension. Measure uncompressed height by lifting the cushion slightly and reading the full depth.
Old foam can compress half an inch or more under normal sitting.
| Component | Frame Measurement | Upholstery Measurement |
|---|---|---|
| Seat width | Inner frame edges | Top cushion edges |
| Seat depth | Front frame to back frame | Front cushion edge to backrest |
| Seat height | Floor to frame top | Floor to cushion top |
| Back height | Frame top to crown | Upholstery top to crown |
A good rule of thumb: if the order form asks for “seat only” or “frame only,” measure the structure. If it asks for “cushion” or “upholstered,” measure the padding. When in doubt, photograph the chair with a tape laid along each point and send the image to the vendor before ordering.
Checking Clearance: Will the Chair Fit in Your Space (or Through your Door?)
Measurements aren’t just about the chair itself. They’re about whether the chair can reach its destination and sit properly once it gets there. A perfectly measured chair is useless if it doesn’t fit through the door or leave room to pull out.
Doorway and Hallway Clearance
Standard interior doors clear 28 to 30 inches. Many older homes have doors at 28 inches. New construction often uses 30 or 32 inches.
Measure the narrowest point in your path: the door width, any hall turns, and ceiling obstructions like light fixtures.
Carry the chair diagonally through tight spaces. The diagonal dimension is often 2 to 4 inches wider than the flat width. Measure the chair’s diagonal by placing the tape from one bottom corner to the opposite top corner.
If that number clears your doorway, you’re good.
Don’t forget hall turns. A straight corridor might clear, but a 90-degree bend can block a wide armchair. Use a rope or painter’s tape to mark the turning path on the floor and walk it with the chair before attempting the move.
Push-Back and Walking Aisle Space
Once the chair is in place, it needs breathing room. The National Kitchen and Bath Association recommends at least 24 inches of clearance behind a dining chair for pulling out and standing. Walkways should maintain 36 inches minimum for comfortable passage.
If you’re arranging a dining set, measure the table first. Subtract the table thickness and overhang from your available space. The remaining gap should be 24 to 30 inches for standard chairs, 30 to 36 inches for thicker upholstered seats.
Consider how people will sit. A chair tucked completely under a table still needs enough back clearance for someone to rise without hitting a wall or cabinet. Leave at least 18 inches behind the chair back for basic movement.
This clearance planning also applies when deciding on seating for different body types. Ensuring proper posture while sitting depends on having enough space to position yourself correctly, which is why understanding chair dimensions is so important alongside resources like How The Right Chair Can Fix Your Posture.
Special Cases: Office Chairs, Wingbacks, Rockers, and Tapered Seats
Standard measurements cover most dining and accent chairs. Some styles require extra steps or different reference points. If you’re working with any of these special cases, follow the adjusted process below.
Office and Swivel Chairs
Office chairs need three additional measurements: base diameter, caster type, and seat slide range. Base diameter determines whether the chair fits under a standard desk gusset. Most five-star bases span 26 to 30 inches.
Caster type affects both floor protection and rolling ease. Standard casters work on hard floors. Soft-wheel casters are needed for carpet.
Measure the stem diameter before replacing casters. Most office chairs use a standard ⅝-inch stem, but some heavy-duty models use ⅞-inch.
Seat slide range matters for adjustable chairs. Measure the distance from the front of the seat pan to the backrest at the lowest and highest settings. This tells you the range of adjustment for ergonomic fit.
When upgrading seating for extended use, understanding the right dimensions helps avoid strain and supports long-term comfort, which is why references on Best Chairs For Better Sitting Posture are useful when selecting or measuring ergonomic chairs.
Wingback and High-Back Chairs
Wingbacks add complexity because the back isn’t a flat plane. The wings project forward, and the crown often curves. Measure overall height from floor to the highest point of the backcrest.
Measure back width at the narrowest point between the wings and at the widest point across the wing tips.
For slipcovers, you’ll need the seat width, seat depth, and the distance from the seat front to the wing tip. The wing projection can add 4 to 8 inches to the overall footprint. Record this separately so the cover designer accounts for the extra fabric.
Throne-style chairs with tall, straight backs follow the same process but usually have simpler geometry. Measure the back as a single vertical plane and note any carved details that extend beyond the flat surface.
Rockers and Gliders
Rockers require clearance for the arc. Measure the rocker radius from the center of the curve to the floor contact point. Add twice the radius to the chair’s overall depth to get the total swing footprint.
Most dining rockers need an extra 12 to 18 inches of rear clearance.
Gliders move on a track rather than a curve. Measure the track length and width. The chair footprint stays mostly in place, but you still need 6 to 12 inches of side clearance for smooth operation.
Tapered and Sculpted Seats
Tapered seats narrow toward the back. Measure width at both the front and the rear. Note the difference.
If the rear is more than 1 inch narrower than the front, specify both numbers when ordering covers or cushions.
Sculpted seats with complex contours need a grid of measurements. Mark the seat surface into thirds front-to-back and left-to-right. Measure width at each intersection point.
This gives upholsterers a profile of the seat’s unique shape.
Common Measurement Mistakes (and How to Fix Them)
Even careful measurers make predictable errors. These mistakes cost time, money, and frustration. Spot them early and correct your process.
Measuring Upholstery Instead of Frame for Slipcovers
This is the most common error. You measure over the cushion and order a cover to those numbers. The cover sits high and gaps at the sides.
The fix: always remove loose cushions and measure the bare frame for slipcovers. If cushions are attached, measure the frame edge where the cushion meets the wood, then subtract half the cushion thickness to estimate the frame depth.
Ignoring Seat Taper
A square-seat template applied to a tapered seat creates a cover that’s too wide in the front and too loose in the back. The fix: measure width at the front and rear edges of the seat. If the numbers differ, record both and specify which is which.
Forgetting Arm Projection
You measure overall width but miss how far the arms stick out. The chair then won’t fit under a console table or against a wall. The fix: measure arm projection separately.
Add it to your layout plan.
Measuring at an Angle
A tape angled up or down reads longer than the true dimension. This happens most often with seat height and back height. The fix: hold the tape perpendicular to the surface.
Use a square or a level to check alignment on vertical measurements.
Not Accounting for Cushion Compression
Old foam sits lower than new foam. Ordering replacements to compressed height leaves a gap. The fix: measure uncompressed thickness by lifting the cushion slightly.
If the cushion is built-in, measure the exposed top and note any visible compression zones.
Overlooking Leg Span for Table Fit
A chair that looks like it fits under a table might hit a pedestal or stretcher. The fix: measure the table’s leg span and compare it to your chair’s leg span. Ensure there’s at least 2 inches of clearance on each side.
Skipping the Doorway Check
You measure the chair perfectly but can’t get it inside. The fix: measure the entire path before purchasing or ordering. Include door widths, hall turns, and stair landings.
Subtract 2 inches from each measurement to account for handling friction.
Confusing Seat Depth with Overall Depth
Seat depth stops at the backrest. Overall depth includes arm projection or a reclined back lean. The fix: label each measurement clearly.
“Seat depth” and “overall depth” are not interchangeable.
If you’re working with styles like the Yaheetech Mid Century Accent Chair, the clean lines make measurements straightforward, but always double-check for subtle taper or arm angle that can throw off a quick read.
How Accurate Measurements Save You Money
Bad measurements cost money in three ways: wasted materials, return shipping, and delayed projects. Each one compounds. A single wrong dimension can turn a $75 slipcover into a $150 mistake when you factor in remeasurement and expedited reorder fees.
The Cost of a Wrong Slipcover Order
A standard dining chair slipcover runs $60 to $120 depending on fabric and construction. If you measure over the cushion instead of the frame, the cover arrives too tight or too loose. Return shipping alone costs $15 to $30.
A replacement order doubles your expense and adds one to two weeks of delay.
Custom upholstery follows the same pattern but at higher stakes. A reupholstered chair with incorrect back height looks proportionally wrong. The fabric pulls at seams or sags at the crown.
Fixing it means stripping and remaking the cover, which often costs 50 to 75 percent of the original price.
Cushion Replacement Errors
Loose seat cushions ordered to the wrong depth slide forward when you sit. You end up buying a second set or returning the first. Memory foam replacements that ignore compression rates look fresh on day one and sag by month three.
Measuring uncompressed thickness and noting foam density prevents both outcomes.
The Delay Tax
Time has a real cost when furniture measurements hold up a project. A dining room refresh stalls because chairs don’t fit through the doorway. A rental turnover drags because slipcovers arrive late and the unit can’t be listed.
Each day of delay carries opportunity cost, whether that’s lost rental income or extended furniture rental fees.
Preventive Savings Breakdown
| Mistake | Direct Cost | Delay Cost | Prevention |
|---|---|---|---|
| Wrong slipcover size | $60 to $150 | 1–2 weeks | Measure bare frame, not cushion |
| Cushion depth error | $30 to $80 per cushion | Material reorder | Measure uncompressed thickness |
| Doorway clearance failure | Moving help, $50 to $200 | Project delay | Measure path before purchase |
| Arm projection miss | Cover remaking, $40 to $100 | Weeks | Record projection separately |
| Leg span miscalculation | Table incompatibility | Replacement chair | Measure table and chair spans |
Smart measurers budget 10 to 15 percent extra time for verification. That investment pays for itself on the first correct order. Double-checking numbers against a photo reference takes five minutes and prevents five hundred dollars in errors.
FAQs About Measuring Chairs
Here are the questions people ask most often, answered plainly.
How many measurements do I actually need?
You need four to eight measurements depending on your project. Slipcovers require six numbers: seat width, seat depth, seat height, back height, overall width, and arm height. Cushion replacements need three: seat width, seat depth, and thickness.
Room clearance checks need three: overall width, depth, and height.
Should I measure the chair or the cushion?
Measure the chair frame for slipcovers and the cushion surface for replacements. Slipcovers stretch over the structure underneath, so frame dimensions give the correct fit. Replacement cushions sit on top of existing upholstery, so padded measurements ensure they match the current profile.
Always confirm which method your vendor requires before ordering.
What’s the difference between seat depth and overall depth?
Seat depth measures from the front edge of the seating surface to where it meets the backrest. Overall depth includes everything that projects forward, such as armrests or a reclined back angle. If your chair has arms that stick out past the seat front, overall depth will be larger than seat depth by the arm projection amount.
How do I measure a wingback chair accurately?
Measure the seat width, seat depth, and seat height first. Then measure the overall back height from floor to crown. Add the wing projection distance from the seat front to the outer edge of each wing.
Record the narrowest back width between the wings and the widest width across the wing tips. This gives cover makers the full profile they need.
Can I use a steel tape measure instead of a cloth tape?
Steel tapes work fine for bare wood or metal frames. They give accurate straight-line measurements and don’t stretch. Cloth tapes conform to curves and upholstered surfaces better.
For mixed projects involving both frame and padding, keep both tapes handy and switch tools depending on the surface.
How much tolerance should I allow for fabric stretch?
Woven cotton and linen stretch roughly 2 to 4 percent across the grain. Knit fabrics stretch more, up to 8 to 10 percent. For tight-fitting slipcovers, subtract 1 to 2 inches from your frame measurements if the fabric has significant stretch.
For non-stretch materials, order to exact dimensions. Always ask the vendor about fabric behavior before finalizing measurements.
What if my chair has asymmetric arms?
Measure each arm separately. Record left arm height, right arm height, left arm width, and right arm width. Note any difference in projection or angle.
Asymmetry is common in antique and handcrafted chairs. Providing both sets of numbers prevents covers that fit one side but gap on the other.
How do I measure a dining chair with a curved seat?
Place the tape along the natural sitting curve rather than stretching it straight across. For width, measure at the widest point of the curve. For depth, follow the curve from front edge to backrest.
If the curve is pronounced, take three width measurements: front, middle, and rear. Record all three so your supplier can match the contour.
Final Decision Checklist: Which Measurements Do You Actually Need?
Before you start measuring, answer these three questions. Your answers determine exactly which numbers matter.
What am I measuring for?
Check the box that applies:
- Ordering a slipcover
- Replacing seat or back cushions
- Reupholstering the chair
- Checking if the chair fits in my room
- Verifying doorway clearance
- Sizing chair caps or arm sleeves
- Matching a set of dining chairs
Your answer locks in your measurement set. Don’t measure beyond what you need. Extra numbers create confusion, not clarity.
What type of chair am I working with?
Different chairs demand different attention points:
- Standard dining chair: seat width, depth, height, back height
- Armchair: add arm height, arm width, arm projection
- Wingback: add wing projection, narrow and wide back measurements
- Office chair: add base diameter, caster stem size, seat slide range
- Rocker: add rocker radius and swing clearance
- Tapered seat: add front and rear width measurements
Identify your chair category and follow the corresponding measurement list. If your chair blends styles, use the most complex category as your guide.
What does my vendor require?
Some companies provide measurement guides tailored to their products. Follow those instructions first. Vendor templates account for seam allowance, fabric stretch, and construction methods specific to their designs.
If no template exists, use the default set for your goal and material.
Your measurement records
Create a simple label for each number before you write it down. A clean record looks like this:
- Seat width (frame): 18 inches
- Seat depth (frame): 19 inches
- Seat height: 18 inches
- Back height from seat: 34 inches
- Overall width (incl. arms): 24 inches
- Arm height from seat: 9 inches
- Arm projection: 6 inches
- Leg span front-to-back: 16 inches
Photograph each measurement with the tape visible. Photos prevent misreading handwriting and serve as proof if a vendor questions your numbers. Store photos alongside your written records for easy reference on reorder or future projects.
When you’re ready to explore specific chair styles after getting your measurements right, checking out detailed reviews like the Bonnlo Beige Accent Chairs Review can help you understand how dimensions translate into real-world comfort and fit for your space. Similarly, comparing options like the Lexicon Swivel Accent Chair or the Karl Home Mid Century Reading Chair becomes much easier when you know exactly what measurements to look for in product specs.